Weak WiFi signal - current problem for residents of apartments, country houses and office workers. Dead zones in a WiFi network are typical for both large rooms and small apartments, the area of which even a budget access point can theoretically cover.
The range of a WiFi router is a characteristic that manufacturers cannot clearly indicate on the box: the WiFi range is influenced by many factors that depend not only on the technical specifications of the device.
This material presents 10 practical advice, which will help eliminate the physical causes of poor coverage and optimize the range of the WiFi router, this is easy to do with your own hands.
The radiation from the access point in space is not a sphere, but a toroidal field, shaped like a donut. In order for WiFi coverage within one floor to be optimal, radio waves must propagate in a horizontal plane - parallel to the floor. For this purpose, it is possible to tilt the antennas.

The antenna is a donut axis. The angle of signal propagation depends on its inclination.
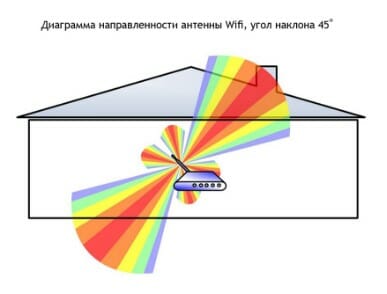
When the antenna is tilted relative to the horizon, part of the radiation is directed outside the room: dead zones are formed under the “donut” plane.

A vertically mounted antenna radiates in a horizontal plane: maximum coverage is achieved indoors.
In practice: Install the antenna vertically - the simplest way optimize indoor WiFi coverage.
Place the router closer to the center of the room
Another reason for the occurrence of dead zones is the poor location of the access point. The antenna emits radio waves in all directions. In this case, the radiation intensity is maximum near the router and decreases as it approaches the edge of the coverage area. If you install an access point in the center of the house, the signal will be distributed throughout the rooms more efficiently.

A router installed in a corner transmits some of the power outside the house, and distant rooms are at the edge of the coverage area.
Installation in the center of the house allows you to achieve even distribution of the signal in all rooms and minimize dead zones.
In practice: Installing an access point in the “center” of the house is not always feasible due to the complex layout, lack of sockets in in the right place or the need to lay a cable.
Provide direct visibility between the router and clients
WiFi signal frequency is 2.4 GHz. These are decimeter radio waves that do not bend well around obstacles and have low penetrating ability. Therefore, the range and signal stability directly depend on the number and structure of obstacles between the access point and clients.

Passing through a wall or ceiling, an electromagnetic wave loses some of its energy.
The amount of signal attenuation depends on the material the radio waves travel through.


*Effective distance is a value that determines how the radius changes wireless network compared to open space when a wave passes an obstacle.
Calculation example: WiFi 802.11n signal propagates in line-of-sight conditions over 400 meters. After overcoming the non-permanent wall between the rooms, the signal strength decreases to 400 m * 15% = 60 m. The second wall of the same type will make the signal even weaker: 60 m * 15% = 9 m. The third wall makes signal reception almost impossible: 9 m * 15 % = 1.35 m.
Such calculations will help calculate dead zones that arise due to the absorption of radio waves by walls.
The next problem in the path of radio waves: mirrors and metal structures. Unlike walls, they do not weaken, but reflect the signal, scattering it in arbitrary directions.

Mirrors and metal structures reflect and scatter the signal, creating dead zones behind them.

If you move interior elements that reflect the signal, you can eliminate dead spots.
In practice: It is extremely rare to achieve ideal conditions when all gadgets are in direct line of sight to the router. Therefore, in a real home, you will have to work separately to eliminate each dead zone:
- find out what interferes with the signal (absorption or reflection);
- think about where to move the router (or piece of furniture).
Place the router away from sources of interference
The 2.4 GHz band does not require licensing and is therefore used for the operation of household radio standards: WiFi and Bluetooth. Despite the low bandwidth, Bluetooth can still interfere with the router.

Green areas - stream from the WiFi router. Red dots are Bluetooth data. The proximity of two radio standards in the same range causes interference, reducing the range of the wireless network.
The magnetron of a microwave oven emits in the same frequency range. The radiation intensity of this device is so high that even through the protective screen of the furnace, the radiation from the magnetron can “illuminate” the radio beam of the WiFi router.
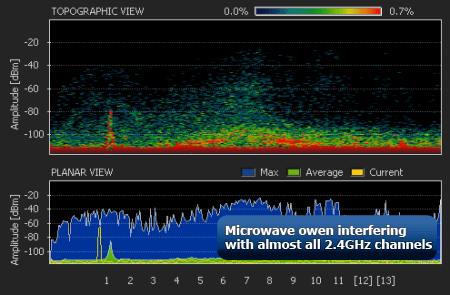
Microwave oven magnetron radiation causes interference on almost all WiFi channels.
In practice:
- When using Bluetooth accessories near the router, enable the AFH parameter in the settings of the latter.
- The microwave is a powerful source of interference, but it is not used very often. Therefore, if it is not possible to move the router, then you simply won’t be able to make a Skype call while preparing breakfast.
Disable support for 802.11 B/G modes
WiFi devices of three specifications operate in the 2.4 GHz band: 802.11 b/g/n. N is the newest standard and provides greater speed and range compared to B and G.

The 802.11n (2.4 GHz) specification provides greater range than legacy B and G standards.
802.11n routers support previous WiFi standards, but the mechanics of backward compatibility are such that when a B/G device appears within the coverage area of the N-router, for example, old phone or a neighbor's router - the entire network is switched to B/G mode. Physically, the modulation algorithm changes, which leads to a drop in the speed and range of the router.
In practice: Switching the router to “pure 802.11n” mode will definitely have a positive effect on the quality of coverage and throughput of the wireless network.
However, B/G devices will not be able to connect via WiFi. If it is a laptop or TV, they can be easily connected to the router via Ethernet.
Select the optimal WiFi channel in the settings
Almost every apartment today has a WiFi router, so the density of networks in the city is very high. Signals from neighboring access points overlap each other, draining energy from the radio path and greatly reducing its efficiency.

Neighboring networks operating at the same frequency create mutual interference, like ripples on the water.
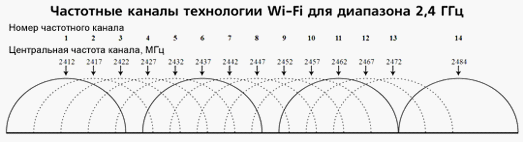
Wireless networks operate within a range on different channels. There are 13 such channels (in Russia) and the router switches between them automatically.
To minimize interference, you need to understand which channels neighboring networks operate on and switch to a less loaded one.
Detailed instructions for setting up the channel are provided.

In practice: Selecting the least loaded channel - effective way expand the coverage area relevant for residents of an apartment building.
But in some cases there are so many networks on the air that not a single channel provides a noticeable increase in WiFi speed and range. Then it makes sense to turn to method No. 2 and place the router away from the walls bordering neighboring apartments. If this does not bring results, then you should think about switching to the 5 GHz band (method No. 10).
Adjust the router transmitter power
The power of the transmitter determines the energy of the radio path and directly affects the range of the access point: the more powerful the beam, the further it hits. But this principle is useless in the case of omnidirectional antennas of household routers: in wireless transmission There is a two-way exchange of data and not only clients must “hear” the router, but also vice versa.

Asymmetry: the router “reaches” to mobile device in the back room, but does not receive a response from him due to the low power of the smartphone’s WiFi module. The connection is not established.
In practice: The recommended transmitter power value is 75%. It should be increased only in extreme cases: turning the power up to 100% not only does not improve the quality of the signal in distant rooms, but even worsens the stability of reception near the router, since its powerful radio stream “clogs” the weak response signal from the smartphone.
Replace the standard antenna with a more powerful one
Most routers are equipped with standard antennas with a gain of 2 - 3 dBi. The antenna is a passive element of the radio system and is not capable of increasing the flow power. However, increasing the gain allows you to refocus the radio signal by changing the radiation pattern.

The higher the antenna gain, the further the radio signal travels. In this case, the narrower flow becomes similar not to a “donut”, but to a flat disk.

There is a large selection of antennas for routers with a universal SMA connector on the market.


In practice: Using an antenna with high gain is an effective way to expand the coverage area, because simultaneously with the signal amplification, the sensitivity of the antenna increases, which means the router begins to “hear” remote devices. But due to the narrowing of the radio beam from the antenna, dead zones appear near the floor and ceiling.
Use signal repeaters
In rooms with complex layouts and multi-story buildings, it is effective to use repeaters - devices that repeat the signal from the main router.


The simplest solution is to use an old router as a repeater. The disadvantage of this scheme is that the throughput of the child network is half as much, since along with client data, the WDS access point aggregates the upstream flow from the upstream router.
Detailed instructions for setting up a WDS bridge are provided.

Specialized repeaters do not have the problem of reducing bandwidth and are equipped with additional functionality. For example, some Asus repeater models support the roaming function.

In practice: No matter how complex the layout, repeaters will help you deploy a WiFi network. But any repeater is a source of interference interference. When there is free air, repeaters do their job well, but with a high density of neighboring networks, the use of repeater equipment in the 2.4 GHz band is impractical.
Use 5 GHz band
Budget WiFi devices operate on the 2.4 GHz frequency, so the 5 GHz band is relatively free and has little interference.

5 GHz is a promising range. Works with gigabit streams and has increased capacity compared to 2.4 GHz.
In practice: “Moving” to a new frequency is a radical option, requiring the purchase of an expensive dual-band router and imposing restrictions on client devices: only the latest models of gadgets work in the 5 GHz band.
The problem with WiFi signal quality is not always related to the actual range of the access point, and its solution broadly comes down to two scenarios:
- In a country house, most often it is necessary to cover an area in free air conditions that exceeds the effective range of the router.
- For a city apartment, the range of a router is usually sufficient, but the main difficulty is eliminating dead zones and interference.
The methods presented in this material will help you identify the causes of poor reception and optimize your wireless network without resorting to replacing the router or the services of paid specialists.
Found a typo? Select the text and press Ctrl + Enter
It is often necessary to quickly check the WiFi signal level in order to select the most free channel with good quality reception. For this task, a simple android app Wifi Analyzer.
With its help you can easily not only identify free channels, but also check the quality Wi-Fi reception in different places of the apartment or cafe or view signal changes over time. After launching, a graph will be visible in the main window of the program, which will display visible wireless networks, the reception level and the channels on which they operate. If they intersect on the graph, this will be clearly displayed.

You can also look at the “rating” of channels, similar to any star ratings, which clearly shows how at the moment It is advisable to choose one or the other of them. Another feature of the application is the analysis of Wi-Fi signal strength. First, you will need to select for which wireless network the test is being performed, and then look at the reception level, while nothing prevents you from moving around the area or checking the change in reception quality depending on the location of the router.
It would also not be amiss to add that our interest in WiFi networks may not only be in passive analysis. With help mobile phone you can also try to guess the password for your wireless access point. For this you will need an application called WIBR.
WIBR is a unique application with which you can hack your neighbor’s Wi-Fi and use his Internet for free. This is not a joke, WIBR works on the principle of automatically selecting passwords (brute force) for Wi-Fi, and if the password is simple, then the probability of guessing the password is close to 100 percent.

Vibr supports hacking several Wi-Fi networks at once, and displays information on one screen; when you click on one of the networks, you can see detailed statistics about the progress of work: the number of passwords per minute, how many password options have already been checked and how many are left.

The application supports loading your own dictionaries; to do this, you need to download them (or write all the possible password options in notepad yourself and save them in txt format), specify the path in the program itself. Especially for our users, we have added more than 10 dictionaries with the most common passwords.

If you are faced with the difficult task of choosing a router, then this article may be useful to you. In it I compare the signal level on different routers. The point is this: I connect the router (routers are always located in a certain place with default settings) and go out into the entrance, i.e. I am separated from the router by a tangential wall and a metal door, I take a laptop (the same one for the purity of the experiment), stand in the same place and see what signal level the laptop receives. Let me clarify right away that if you have a one-room or two-room apartment (less than 40 square meters in area), then you are unlikely to encounter the problem of poor signal level (unless the walls are lined with iron sheets).
To begin with, I propose to analyze what interferes with the propagation of the Wi-Fi signal.
1 Other Wi-Fi devices (access points, wireless cameras, etc.) operating within the range of your device and using the same frequency range. Those. The more neighbors using Wi-Fi, the worse the signal level and Wi-Fi speed will be.
2 Various household and digital appliances operating within the coverage area of your Wi-Fi device (Microwave ovens, Bluetooth devices, baby monitors, etc.).
3 Obstacles (walls, doors, even trees (since their foliage is 99% water, and it can absorb the Wi-Fi signal))
Various obstacles located between Wi-Fi devices can partially or significantly reflect/absorb radio signals, resulting in partial or complete signal loss.
In cities with multi-storey buildings, the main obstacle to the radio signal is buildings. The presence of permanent walls (concrete + reinforcement), sheet metal, plaster on the walls, steel frames, etc. affects the quality of the radio signal and can significantly degrade the performance of Wi-Fi devices.
Indoors, mirrors and tinted windows can also cause radio signal interference.
4 Long distances between Wi-Fi devices.
Please remember that wireless Wi-Fi devices have a limited range. For example, a home Internet center with an 802.11b/g Wi-Fi access point has a range of up to 60 m indoors and up to 400 m outdoors.
Indoors, the range of a wireless access point can be limited to several tens of meters - depending on the configuration of the rooms, the presence of solid walls and their number, as well as other obstacles.
So let's look at the results.
As can be seen from the graph, Dlink dir-620 shows average but stable results of -60dBm (the higher this value, the more stable and higher the speed of the Wi-Fi network). I expected it to be worse, but in my opinion it was a good result.
The result was disappointing, extremely unstable connection.
Not a bad result, but to be honest, I thought it would be better, since the TP-LINK WR841ND/ TP-LINK WR841N router uses antennas 5 dBi.
Strange, but the signal on this router is no better than others, while Windows defines the signal level as “Good”.
There are dozens for Windows, but such as WiFi SiStr unique of its kind. We are talking about the utmost simple application, which will allow you as a user to find out the signal level of any Wi-Fi points. Of course, if it is within the reach of the sensor.
Interestingly, the wireless signal strength is shown digitally on the screen. After you click downloadWiFi SiStr and install the program, a small panel will appear on the desktop. You can place it in any part of the screen: bottom, top or even in the middle. It will show digital and graphical signal level values.
It often happens that a user cannot access a website for unknown reasons - especially if you are connected via Wi-Fi. There is another situation: the messaging client periodically interrupts the connection - you have to constantly reconnect. To solve this problem, just look at the signal status panel and make sure that it is quite sufficient for a stable and fast internet. If you have the WiFi SiStr program, then this is quite easy to do.
Features of the WiFi SiStr program:
- Flexible in setup. Despite the simple interface of the panel, you can even customize it. Just right-click on the status bar and a menu with settings will open.
- Convenient. You can monitor the signal level directly on the desktop of your PC or laptop.
- It does not consume a lot of system resources, it is not just small - it has a miniature size.
- For correct WiFi work SiStr you will need .NETFramework versions 1.1 and higher.
- When launched, it always minimizes to tray and does not interfere with computer work at all.
Today there is a router in almost every home. But such an abundance Wi-Fi routers could not but affect the quality of the signal.
Very often networks overlap one another and interruptions in the Internet signal occur. And this despite the fact that he is strong and nothing visible should interfere with him.
The reason may just be the overlap of several access points on one channel. For apartment buildings this problem is especially relevant. Only the user should distinguish between problems with the signal and the router. This is how a smartphone on the Android platform completely freezes at the stage of downloading torrent files. Here the reason is different.
Wi-Fi breaks can occur as follows:
- A tablet or smartphone behaves as it wants - when it connects normally to the network signal, when it doesn’t connect at all;
- A sharp drop in download speed without good reason (and low speed is also observed on internal resources);
- Communication is lost in a certain place in the apartment, where there are no barriers.
The reason for all these troubles is precisely the use of the same communication channel by many points of wireless routers. Subsequently, congestion of this channel leads to low speed and connection interruptions.
Solving a problem quickly means changing the channel. Most users don’t even know how to analyze this situation and how to change the “Auto” setting on their router.
How to change the communication channel to different types routers can be read at this link.
Help you analyze the status of your wireless network free programs, which can be downloaded without problems on the Internet for:
- smartphones with different platforms;
- laptops and PCs.
There are thirteen channels in total for signal transmission in Russia. So out of these 13 channels the first, sixth and eleventh do not intersect. But not all countries use 13; in the USA, for example, only 12 are allowed. For different versions operating system There are specific features regarding the use of certain channels.
So Windows 10 does not see channel 13, and in the router settings it is impossible to change the region to Europe in order to correct access to this channel.
Version 7 of the OS also does not see channels larger than 12. Therefore, when choosing another unloaded channel, this must be taken into account.
This is exactly what analyzer programs are needed to identify free channels, configure the router on them and work calmly.
If the user has a problem connecting to any channel or the signal lags due to channel congestion, then you can ask the technical support of the official Windows website for answers to your questions.
The most convenient and simple programs that analyze the occupancy of communication channels are the following:
- inSSIDer 4 - download;
- Free Wi-Fi Scanner - download;
These programs will help you learn other useful information about networks. You can recognize the type of security and signal speed. Convenient graphs help you analyze the signal. The figure below shows how different users overlap on the channels and which access point has the highest frequency signal.
An example of network analysis using InnSider
When downloading the program from the official website, the user should pay attention to the terms of use. Very often today they offer only demo versions of programs with a period of use of no more than a month. after that you need to buy the program.
As can be seen from the picture, after analysis it is clearly seen that the most crowded channel is 6. That is, you should disconnect from it and select free 2, 3, or 4, or any other except the first and eleventh, which are also already occupied.
Network analyzer for Android
Most convenient for smartphone on the Android platform, use the Wi-Fi Analyzer program. No problems searching or downloading. The user logs in via his phone Google service Play and through the search finds this application and downloads it. When the smartphone is turned on, you can download the application via a PC.
After installation, you can go into the program and analyze communication channels. It will be immediately visible at what frequency the router operates and on what channel. All this will be indicated on the available charts. Just select channels and properties in the settings.
That is, in the illustrative example there is no need to change anything, because the signal does not intersect with almost anyone. In the same program, you can select the “channels” tab in the properties and see which channel has the highest and best signal. The rating is indicated by stars.
The example shows that the best signal without interference is on channels 12, 13 and 14. The program installs quickly and erases quickly. Therefore, users should not be afraid that the application will take up a lot of memory on the device.
There is another convenient tab in the same application that will show the signal frequency. With such a pointer, you can move around the apartment and choose exactly the place where the signal will be the strongest.
How to change automatic channel selection on a D-Link router?
There are a huge number of routers on the market today. But according to statistics, the most frequently purchased model is the D-Link model. How can I disable auto channel selection on it?
To do this, type in the Internet address bar address 192.168.0.1. In the window that opens, type admin in both the login and password. Unless the user himself changed them. The standard login and password are always written in back cover boxes from under the router.
A window appears, in which you select “advanced settings”, and then the basic ones, as in the figure above. After selecting the basic properties of the wireless network, you should find the “channel” line in the window that appears and select from it the free channel that any program for analyzing communication channels showed.
After this, the connection may be interrupted briefly and restarted again. If this does not happen, you need to check the router settings again and if there is a dialog box in the upper right corner asking you to save changes, you need to click and save it. After this, the data transfer and download speed should increase.
With the help of such simple manipulations, any user today can correct minor errors in the wireless network in their apartment without calling a technician or paying for their services.
So, how to choose this very high-speed and high-frequency wireless communication channel?
- Launch the analyzer program;
- Determine a free channel;
- Find a place in the apartment with the most high frequency reception
- Check non-overlapping channels (1,6,11 - if they are free) at this frequency, for example, reception speed and jumps;
- Install the selected free channel with a high reception frequency - reconfigure the router, accept the changes.
Thus, fixing problems with lost signal and lost speed turned out to be very simple, you just need to strictly follow the above steps.


