- Regularity. Creating backups should be as regular as brushing your teeth in the morning.
- Examination. Check the backup you just made. It will be very disappointing if, at a particularly tense moment, your lifesaver turns out to be a dummy. Open several files from the archive and make sure they work.
- Separateness. It is better to store backups not in one place, but in at least two. For example, on an external hard drive and in the cloud. After all, disks sometimes fail, and cloud storage may not be available at the right time.
- Demarcation. Divide what you plan to store into several clear categories. Data of varying importance require different approaches to archiving.
System solutions
Windows
Windows has standard remedy archiving and recovery, which allows you to save both individual files and an entire image from which you can restore the system in the event of a failure.
Windows 7
Go to the “Control Panel” by left-clicking on the “Start” button and selecting the appropriate item. In “Control Panel” select “System and Security” → “Backup computer data” → “Set up backup”.
Next, the system will ask you to specify a location to save the archive. Please note: if you want to backup data from drive C, you will not be able to save it there. To do this, you will have to select another medium, for example a second physical disk, flash drive, DVD or folder in local network. If we recall the principles of creating a backup, the archive must be stored on a separate medium, and not on the very computer from which the copy was made.
Next, the system will prompt you to automatically or manually select folders for archiving. Click on “Give me a choice” and in the window that opens, check the boxes for the folders you want to save. Click Next → Save settings and exit.
Now the “Archive” button appears in the “Backup or restore files” window. Clicking on it will start the process of archiving your data.

Recovery follows the same principle. To do this, click on the item “Select another backup to restore files” and indicate the one into which the backup was made.
Windows 8 and above
The built-in File History tool allows for real-time archiving. For it to work, only initial setup is required.
Go to "Control Panel". To do this, click on the “Start” button with the right mouse button and context menu find the line you need.
As a storage location, select a disk other than the system one, a flash drive, or a network folder. Click Enable.
“File History” will automatically copy the following libraries: “Documents”, “Music”, “Images”, “Videos” - and standard user folders: Windows, “Desktop”, “Favorites”.
By default, backups are made every hour, but you can change this time, for example, to 10 minutes. However, this will require more disk space. The retention time for each copy can be configured in the Advanced Options menu.
macOS
Time Machine - standard solution Apple, designed to create backup copies of applications, files and folders, documents, videos, music.
To use Time Machine, you will need third-party storage, such as a flash drive, external hard drive, or network solution.
When you connect an external drive to your Mac, you should be asked whether to use it as backup storage? Select "Use As" backup disk».

If the window does not appear, you must select the backup disk manually:
- go to the menu and open Time Machine settings;
- click on “Select backup disk”;
- select the one you need and click on “Use disk”.

Backups will be automatically created once per hour, copies for the past month - every day, and backups for the entire time - every week. Don't be afraid that your volume hard drive it won't be enough. Time Machine will only save changed information, and old copies will be automatically deleted as disk space becomes full.
Android
Android Backup Service
Designed to create data backups Google accounts. With its help you can save:
- data about Wi-Fi networks;
- desktop wallpaper;
- Gmail settings;
- Google Play apps;
- language and input settings;
- date and time;
- row settings third party applications.
To create a backup you need:
- open device settings;
- go to “Personal data” → “Restore and reset”;
- enable "Data backup".
To restore data on another device, just log in with your account. To restore the settings of saved applications, go to “Personal data” → “Recovery and reset” → “Auto recovery”.
Synchronization
Android provides a standard synchronization tool that allows you to save user contacts, applications installed from Google Play, calendar, display settings, languages and input methods, Google data Drive and settings of some third-party applications. The tool requires a Google account.
Synchronization in Android is enabled by default. If you want to get the latest backup copy, do the following:
- open your phone settings;
- in the “Accounts and Synchronization” section, select Google;
- Check the required boxes and click “Synchronize”.


The data will automatically be sent to Google cloud storage. To restore them on another Android device, just connect your account to it.
You can also synchronize most popular accounts: Skype, Telegram, Viber and VKontakte. To synchronize photos and images, Android has a built-in Google solution Photo.
iOS
iTunes
Apple's universal application for receiving and playing content. Allows you to locally save data from a device connected to a computer under Windows control or macOS. This is especially convenient when you do not have Internet access.
To create a copy when iTunes Help do the following:
- connect the device to the computer;
- go to the “Devices” tab;
- click "Sync".
- photos;
- notes;
- contact list;
- calendar;
- SMS/MMS messages;
- Safari browser;
- access point settings;
- application data;
- main screen view.
iCloud
Cloud service for storing user data. Like any cloud, it has two limitations: the need for Internet access and a relatively small (5 GB) amount of free allocated space.
To save data when iCloud help On your device, go to Settings → iCloud → Backup copy" and start the copy creation process.
Saved in iCloud:
- purchase history in the App Store;
- photos;
- Phone settings;
- application data;
- main screen view;
- ringtones;
- voice mail.
Software
Windows
License: commercial software.
Russian language support: There is.
A simple solution for creating backups. Allows you to save both individual files (photos, music or movies) and mail files, for example from Microsoft Outlook or TheBat.
In the main program window, click “Create” new task» → “Create a backup copy”. From the directory tree, select the data you want to save. In our case, this will be the “Music” folder on the desktop.


Finally, give the task a name and click Finish. Archiving is complete.
Data recovery is performed using the same principle. Select the saved backup copy, and then select the location where you want to restore it.
The trial period for using the program is 30 days. The developers offer to purchase the full basic version for 800 rubles. There are other versions of Handy Backup - Professional and Expert. Their capabilities are much wider and tailored to professional needs; for our purposes, the Standard version is quite sufficient.
License: shareware.
Russian language support: No.
Another solution for creating backups and recovering lost files. The interface is so simple and clear that even the lack of Russian language will not be an obstacle.
First of all, choose where to save your data. Let it be a removable drive E.

The next step is to specify the data to be saved. The program offers both a smart choice, where you can mark desktop files at once, system folders“Pictures” or “Video”, as well as the directory tree. Go to it and save the already familiar “Music” folder.

After clicking on the checkbox, the archiving window will open. On the selected drive, the program automatically creates a Genie TineLine folder, where it places the saved files.
Save and restore functions are available in the basic version of Genie Timeline Free. The advanced paid versions of Genie Timeline Home and Genie Timeline Pro have much greater capabilities: sending notifications by email, highly secure data encryption, and setting up a schedule. But for saving home files, the Free version is quite enough.
Genie TineLine has an iOS app that allows you to check the status of your backups on your computer.
License: commercial software.
Russian language support: There is.
A powerful tool for creating backups and restoring data. You can store backups not only on physical disks, but also on Acronis’s own cloud service. True, for this you will have to subscribe for a year, and the amount of space provided will depend on tariff plan. With a standard subscription, 50 GB are allocated, when purchasing a premium version - from 1 TB.
Immediately after installation, the program prompts you to choose what data to send to the copy: from the entire computer, from disks and partitions, or individual folders.

Select "Files and folders" and select the ones you need. Let this again be the “Music” folder on the desktop. Click "OK" and proceed to select storage.

Select flash drive E, click “OK” → “Create a copy” again. A copy of the “Music” folder has been created on a flash drive.
Acronis has others useful features. For example, “Archive” allows you to free up disk space by packing large files, and the “Disk Cloning” tool will create a complete copy of local disks, which will allow you to restore the system to its original state in the event of a failure.
The cost of the program is 2,700 rubles. A standard subscription for a year will cost users 2,400 rubles, an extended one - 5,100 rubles. Mobile applications work in conjunction with the desktop version and are downloaded for free.
macOS
Carbon Cope Cloner
License: commercial software.
Russian language support: No.
A utility for creating a duplicate disk. Russian language support is not provided, but understanding the interface will not be difficult.
In Source Disk, select the drive you want to copy. In Target Disk, specify the location to store the copy. Start the process with the Clone button.

The free period of using the program is 30 days. After Carbon Cope Cloner will cost 2,405.65 rubles.
Android
License: shareware.
Russian language support: There is.
A convenient solution for creating backups and synchronizing applications on Android that does not require root rights. However, for full operation you will have to install Helium on a computer running Windows, Linux or macOS.
After installing the application on your smartphone, you will immediately receive a notification about the need for the desktop version. To make installation easier and save time, the program offers to send a link to a user-friendly messenger or email. From there follow the link to the program website, download and run. Installation in the “Next” → “Next” → “OK” style does not cause any difficulties.
While the program is installing, mobile app asks to connect the phone to the computer and enable USB debugging.


After receiving a notification about successful synchronization, you can disconnect your smartphone from your computer.
Open the mobile application. From the list installed programs select the ones you need and click on the “Reservation” button. Specify where the backup will be stored and wait for the process to complete.


To restore from a backup, go to the “Restore and Synchronization” tab, specify the storage location with the copy, select required applications and click "Recovery".
The basic version of the program is free, the cost of the extended version is 149.86 rubles.
The extended version allows you to:
- disable advertising;
- install backup Scheduled;
- enable synchronization between Android devices;
- save data in the cloud.
Owners of Motorola devices and some Sony models will not be able to install the application.
License: shareware.
Russian language support: There is.
Most popular among users Android tool for application backup. Requires root access to the device.
To create a backup copy of one or more applications, open the "Backups" tab, which presents full list installed software. An exclamation mark next to an application indicates that a copy has not yet been created for it. The phone icon means that the program is stored on the device's internal memory. The SD card icon indicates applications stored on the memory card.
Select the application and click “Save” in the menu that opens.


The backup has been created. Now, if you enter the application again, you can see the “Restore” button.
Titanum Backup supports group work with applications and backups. To do this, go to “Menu” → “Batch actions”.
This function allows you to:
- check backups - both recently created and entire ones - for errors;
- make backup copies of all installed applications;
- make backup copies of all system data;
- delete old backups;
- restore all backups;
- restore all system data;
- clear application cache;
- remove system or user applications.
The functionality of Titanium Backup is much broader, but for our purposes the listed capabilities are quite sufficient.
The extended version of Titanium Backup costs 349 rubles. Its main features:
- creating multiple backups for the application;
- encryption of reserved data;
- checking all archives;
- batch freezing and unfreezing of applications;
- synchronization of backups with the cloud.
iOS
iMazing
License: commercial software.
Russian language support: There is.
Compatibility: Microsoft Windows, macOS.
In fact, it is a file manager with backup capabilities. In many ways it is similar to iTunes, but working in it is much easier and more enjoyable. You can transfer data both via cable and via Wi-Fi, and in iMazing there is no limit on the number of connected devices.
When you connect your device to your computer, iMazing automatically makes a backup of it. The function of changing data directly in a saved copy is very useful: the next time you connect, the changed data is instantly synchronized.
The free period is 30 days, after which you will have to pay $39.99 for use on one computer.
License: commercial software.
Russian language support: No.
Compatibility: iOS.
A tool for backing up devices with . Allows you to save notes, contacts, photos, messages, call history and much more.
To create a backup, just select what you want to save and click on the corresponding icon. A copy can be stored on your smartphone, computer, in the cloud, or sent by email.
To restore data, click on the Restore button in the menu on the left side of the screen.


BackupAZ costs $2.99.
iLex
License: free software.
Russian language support: There is.
Compatibility: iOS.
And this one software will require you to have a jailbreak. Free app iLex allows you to save absolutely any data from the device, and you don’t need a computer to operate it.
Having created a backup copy, save it where it is convenient for you, and after flashing the device or in case of loss, copy the archive to your phone and restore the necessary information.


Cydia
License: free software.
Russian language support: There is.
To do this, just go to Manage Accounts, enter your account and select Installable Purchases. But this can only be done for purchased applications. Cydia does not save information about free ones.
Cloud solutions
Google Drive
License: shareware.
Russian language support: There is.
Compatibility:
Allows you to store user data on Google servers, differentiate access rights to files and folders, open access and share them with other Internet users.
Storage includes:
- Google Drive - used to store files;
- Gmail - saves the user's contacts and is a powerful email client;
- Google Photo - automatically finds images on devices and saves them to the cloud.
15 GB is provided for free. For larger volumes you will have to pay from $2.99 to $299. The maximum storage capacity is 30 TB, and the maximum uploaded file is 5 TB.
2 GB of storage is available for free use. The cost of 1 TB will be 9.99 euros. Unlimited space can be purchased for 10 euros per month.
Yandex.Disk
License: shareware.
Russian language support: There is.
Compatibility: browsers, Microsoft Windows, macOS, Android, iOS.
Cloud service of Russian origin, former Yandex.People. Like previous solutions, it allows you to save data in the cloud and share it with other Internet users. Supports synchronization between different devices.
Users are provided with 10 GB free of charge. For an additional 10 GB, Yandex asks to pay an additional 30 rubles, for 100 GB - 80 rubles, and the cost of 1 TB will be only 200 rubles.
Many users of Android devices know that experiments with firmware, installation of various add-ons and fixes quite often lead to the device not working, which can only be corrected by installing the system completely, and this process involves completely clearing the memory of all information. If the user has taken care in advance to create a backup copy of important data, or, even better, a full system backup, restoring the device to the “as it was before...” state will take a matter of minutes.
There are many ways to back up certain user information or full backup systems. What is the difference between these concepts and for which devices is it advisable to use one or another method will be discussed below.
A backup copy of personal information means saving data and content generated by the user during the operation of the Android device. Such information includes a list of installed applications, photographs taken by the device’s camera or received from other users, contacts, notes, music and video files, browser bookmarks, etc.
One of the most reliable, and most importantly simple ways To save personal data contained in the Android device is to synchronize data from the device’s memory with cloud storage.

Full system backup
The above methods and similar actions allow you to save the most valuable information. But when flashing devices, not only contacts, photos, etc. are often lost, because manipulations with device memory sections involve clearing them of absolutely all data. To reserve the opportunity to return to the previous state of software and data, you only need a full backup of the system, i.e., a copy of all or certain sections of the device’s memory. In other words, a complete clone or cast of the software is created in special files with the ability to restore the device to its previous state later. This will require the user to have certain tools and knowledge, but can guarantee complete safety of absolutely all information.
Where to store the backup? When it comes to long-term storage, in the best possible way there will be use of cloud storage. When saving information using the methods described below, it is advisable to use a memory card installed in the device. If it is not available, you can save backup files to the internal memory of the device, but in this case it is recommended to immediately copy the backup files to a more reliable location, such as a PC drive, immediately after creation.
Method 1: TWRP Recovery
From the user's point of view, the simplest method of creating a backup is to use a modified recovery environment for this purpose - custom recovery. The most functional among such solutions is TWRP Recovery.


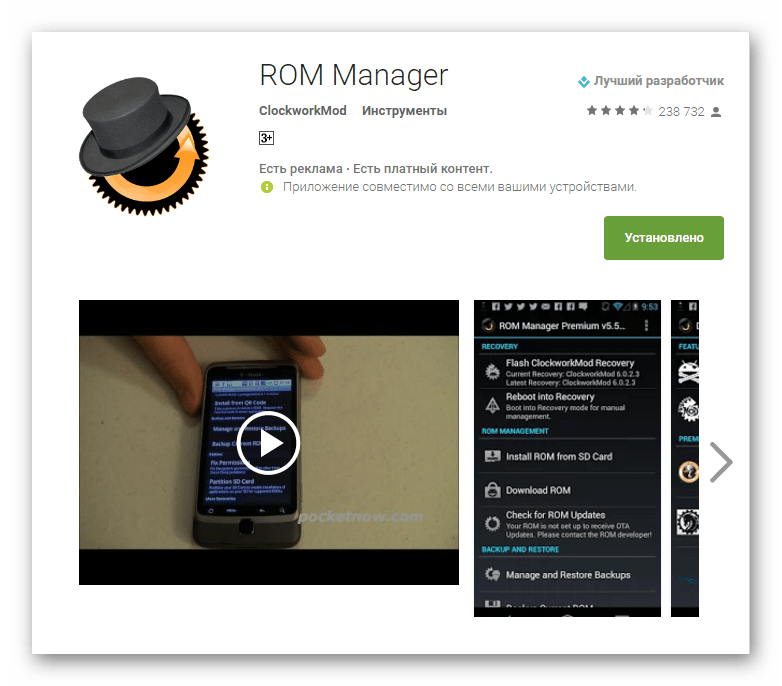
Method 2: CWM Recovery + Android ROM Manager App
As in the previous method, when creating a backup of the Android firmware, a modified recovery environment will be used, only from a different developer - the ClockworkMod - CWM Recovery team. In general, the method is similar to using TWRP and provides no less functional results - i.e. firmware backup files. At the same time, CWM Recovery does not have the capabilities that many users need to manage the process of creating a backup; for example, it is impossible to select individual partitions for creating a backup. But the developers offer their users a good Android application ROM Manager, using the functions of which you can start creating a backup directly from operating system.


Method 3: Titanium Backup Android App
Titanium Backup is a very powerful, yet quite easy-to-use tool for creating system backups. With this tool you can save everything installed applications and their data, as well as user information, including contacts, call logs, sms, mms, dots WI-FI access and other.

The advantages include the ability to widely customize parameters. For example, you can select applications whose data will be saved. To create a full-fledged Titanium Backup, you must provide root rights, that is, for those devices on which Superuser rights have not been obtained, the method is not applicable.

It is highly advisable to take care in advance of a safe place to store the backups you create. Inner memory smartphone cannot be considered as such, it is recommended to use a PC disk, cloud storage, or, in extreme cases, a MicroSD card of the device to store backups.
- Install and launch Titanium Backup.
- At the top of the program there is a tab "Backups", let's move on to it.
- After opening the tab "Backups", you need to call the menu "Batch Actions" by clicking on the button with the image of a document with a checkmark located in the upper corner of the application screen. Or click touch button "Menu" under the device screen and select the appropriate item.
- Next, press the button "START" located next to the option “Make r.k. all user software and system data".A screen opens with a list of applications that will be backed up. Since a full backup of the system is being created, nothing needs to be changed here; you need to confirm your readiness to start the process by clicking on the green checkmark located in the upper right corner of the screen.
- The process of copying applications and data will begin, accompanied by the display of information about the current progress and the name of the software component, which is saved in this moment time. By the way, you can minimize the application and continue using the device as usual, but in order to avoid failures, it is better not to do this and wait until the copy is created; the process happens quite quickly.
- When the process is complete, a tab opens "Backups". You may notice that the icons to the right of the application names have changed. Now these are peculiar emoticons of different colors, and under each name of the software component there is an inscription indicating that a backup copy was created with the date.
- Backup files are stored in the path specified in the program settings.

To avoid loss of information, for example, when formatting memory before installing system software, you should copy the backup folder to at least a memory card. This action can be done using any file manager for Android. A good solution for performing operations with files stored in the memory of Android devices is ES Explorer.


Additionally
In addition to the usual copying of the backup folder created with Titanium Backup to a safe place, in order to be safe from data loss, you can configure the tool so that copies are created immediately on a MicroSD card.


Method 4: SP FlashTool+MTK DroidTools
Using the SP FlashTool and MTK DroidTools applications is one of the most functional ways that allows you to create a truly complete backup of all memory sections of your Android device. Another advantage of this method is that it is not necessary to have root rights on the device. The method is applicable only for devices built on the Mediatek hardware platform, with the exception of 64-bit processors.
- To create a full copy of the firmware using SP FlashTools and MTK DroidTools, in addition to the applications themselves, you will need installed ADB drivers, drivers for MediaTek boot mode, as well as the Notepad++ application (you can also use MS Word, but regular Notepad will not work). Download everything you need and unpack the archives into a separate folder on the C: drive.
- Turn on the mode on the device "USB Debugging" and connect it to the PC. To enable debugging,
first the mode is activated "For developers". For this we follow the path "Settings" — "About the device"- and tap five times on the item "Build number".
Then in the menu that opens "For developers" activate the item using the switch or checkbox "Allow USB Debugging", and when connecting the device to a PC, we confirm permission to carry out operations with using ADB.

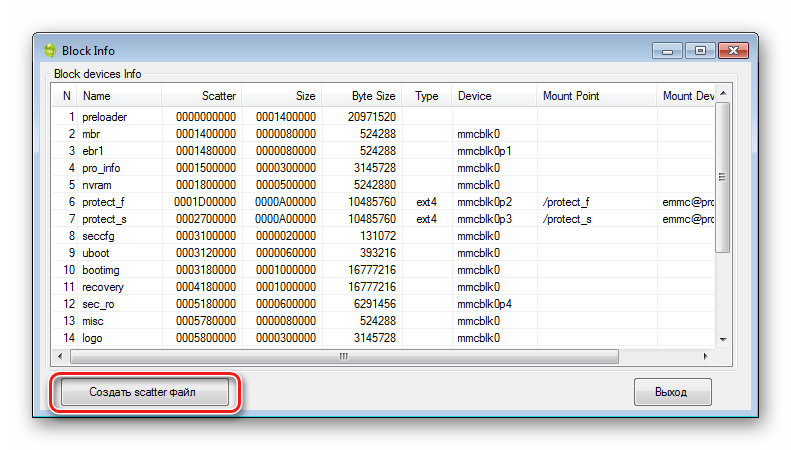
- Next, you need to launch MTK DroidTools, wait for the device to be detected in the program and press the button "Block Map".
- Previous manipulations are the steps preceding the creation of the scatter file. To do this, in the window that opens, click the button “Create scatter file”.
- The next step is to determine the address that will be needed to indicate to the SP FlashTools program when determining the range of blocks in the memory of the device for reading. Open the scatter file obtained in the previous step in Notepad++ and find the line partition_name: CACHE:, under which there is a line with the parameter linear_start_addr just below. The value of this parameter (highlighted in yellow in the screenshot) must be written down or copied to the clipboard.
- Direct reading of data from the device memory and saving it to a file is carried out using the SP FlashTools program. Launch the application and go to the tab "Readback". The smartphone or tablet must be disconnected from the PC. Press the button "Add".
- In the window that opens, there is only one line. Double-click on it to set the reading range. Select the path where the future memory dump file will be saved. It is better to leave the file name unchanged.
- After determining the save path, a small window will open in the field "Length:" where you need to enter the value of the linear_start_addr parameter obtained in step 5 of this instruction. After entering the address, press the button "OK".

Press the button "Read Back" tab of the same name in SP FlashTools and connect the switched off (!) device to the USB port.
- If the user has taken care of installing the drivers in advance, SP FlashTools will automatically detect the device and begin the reading process, as evidenced by the filling of the blue progress bar.
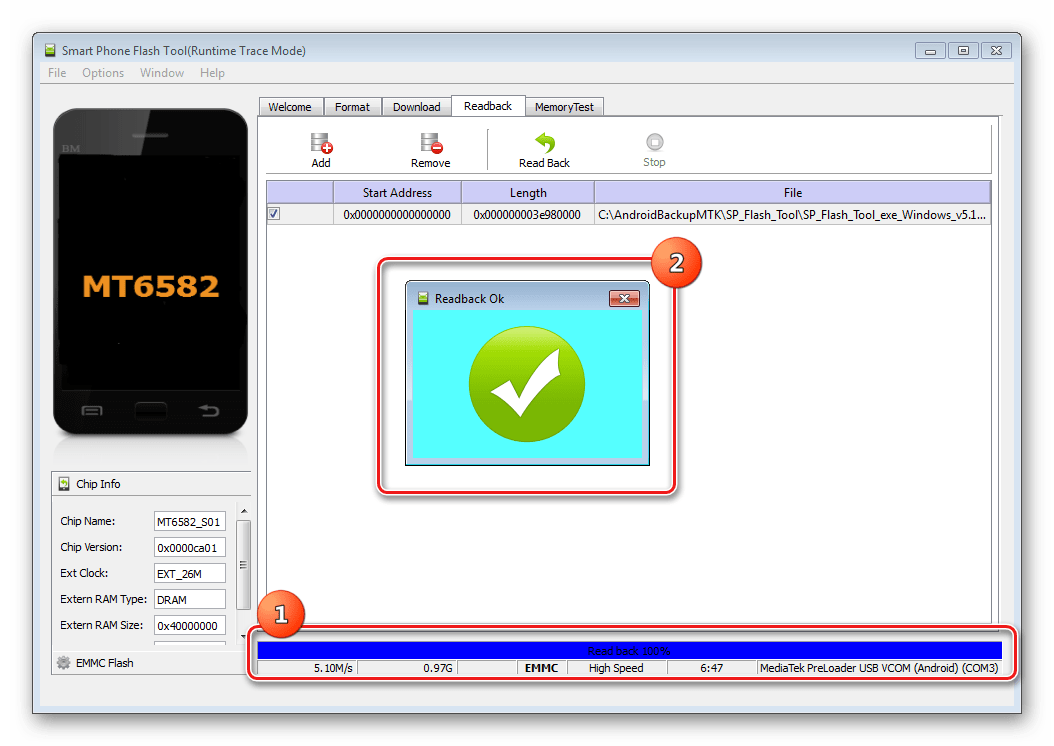
Upon completion of the procedure, a window appears "Readback OK" with a green circle with a confirmation checkmark inside.
- The result of the previous steps is the file ROM_0, which is a complete dump of the internal flash memory. In order to make it possible to carry out further manipulations with such data, in particular, upload firmware to the device, several more operations are required using MTK DroidTools.
Turn on the device, boot into Android, check that "Debugging via USB" turned on and connect the device to USB. Launch MTK DroidTools and go to the tab "root, backup, recovery". Here you need a button “Make a backup from ROM_ flash drive”, press it. Open the file obtained in step 9 ROM_0. - Immediately after pressing the button "Open" The process of dividing the dump file into separate images of partitions and other data necessary for recovery will begin. Process progress data is displayed in the log area.
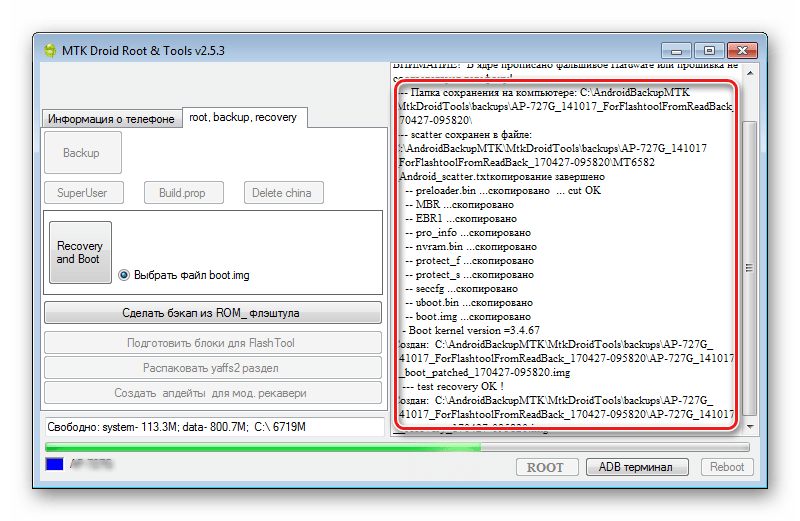
When the procedure for dividing the dump into separate files complete, the message will be displayed in the log field "task completed". This completes the work and you can close the application window.
- The result of the program is a folder with image files of the device’s memory partitions - this is our system backup.


And choose the path to save the scatter.


Method 5: System backup using ADB
If it is impossible to use other methods or for other reasons, to create a complete copy of the memory partitions of almost any Android device, you can use the OS developer tools - the Android SDK component - Android Debug Bridge (ADB). In general, ADB provides all the possibilities for carrying out the procedure; only root rights on the device are required.
It should be noted that the method in question is quite labor-intensive and also requires quite a bit from the user. high level knowledge of ADB console commands. To facilitate the process and automate the entry of commands, you can turn to the wonderful shell application ADB Run, this automates the process of entering commands and saves a lot of time.
- The preparatory procedures consist of obtaining root rights on the device, enabling USB debugging, connecting the device to the USB port, and installing ADB drivers. Next, download, install and launch the ADB Run application. After the above is completed, you can proceed to the procedure for creating backup copies of partitions.
- We launch ADB Run and check that the device is detected by the system in the desired mode. Main menu item 1 - "Device attached?", in the drop-down list we perform similar actions, select item 1 again.

A positive answer to the question whether the device is connected in ADB mode is the ADB Run response to the previous commands in the form of a serial number.
- For further manipulations, you need to have a list of memory partitions, as well as information about which “disks” - /dev/block/ the partitions were mounted. Using ADB Run, getting such a list is quite easy. Go to the section "Memory and Partitions"(item 10 in the main menu of the application).
- In the menu that opens, select item 4 – "Partitions /dev/block/".
- A list opens listing the methods by which attempts will be made to read the necessary data. Let's try each item in order.

If the method does not work, the following message is displayed:

Execution will have to continue until the full list of partitions and /dev/block/ appears:

The received data must be saved in any way in an accessible way, automatic function saving in ADB Run is not provided. The most convenient way to capture the displayed information is to create a screenshot of a window with a list of sections.


This may be required both when reinstalling Windows on an old computer, and to transfer files and settings from an old computer to a new one. After this, we will consider in detail all the nuances of installation, and.
1. What files need to be copied
If you are reinstalling Windows on an old computer, then you need to make a backup copy of all the files you need located on the “C” drive. The easiest way is to copy them to another disk partition (for example, to drive “D”). They can also be copied to external drive, flash drive, DVDs, to another computer or cloud storage on the Internet.
Don't forget to copy files from your desktop and from standard folders users such as “My Documents”, “My Pictures”, etc., since they are usually located on the “C” drive, which will be cleared in the process Windows installations. Go through other folders on drive “C”, in case there is something you need there that you forgot about.
2. Copying files to another disk partition
First, determine how much space there is on the disk partition where you plan to copy files (for example, on drive “D”). To do this, right-click on the selected drive and select “Properties”.

Look at the volume indicated in the “Free” column.

Then select the folders and files that you want to copy with the mouse, right-click on any of the selected elements, select “Properties”.

Make sure they will fit on the selected disk partition.

If your files fit on the selected disk, click on any of the selected elements and select “Copy”.

Then go to the disk partition where you wanted to copy your files (I made the “Backup” folder on drive “D”), right-click and select “Paste.”

Wait until copying finishes. You can copy other folders and files in the same way. If your disk does not have a second partition or there is not enough space on it, then use the other copying methods listed below.
3. Copying files to a flash drive
Copying files to a flash drive is done in the same way as copying to another hard section disk.
Transcend JetFlash 790 8Gb
Also remember to make sure that there is enough space on the flash drive.

There are more convenient way copying to a flash drive. Select the folders and files you want to copy with the mouse, right-click on any of them, select “Send” - “ Removable drive(F.” The files will immediately begin to be copied to the flash drive, this is very convenient!

Instead of “Removable disk (F”), the name of the flash drive manufacturer or another label specified by the user may be displayed; the drive letter may also be different, for example, “Transcend (G”).

4. Using the Total Commander program
Using the program " Total Commander» Copying files is much more convenient. You can download the program itself below in the “” section. After installation, open "Total Commander" using the desktop shortcut. Click the mouse on the number indicated on the screen (1, 2 or 3).

In one panel, select the folder into which you want to copy the files, and in the other panel, select the files and folders you want to copy and press “F5”.

This is very convenient because you don't have to switch between multiple windows to copy files. File selection can be done using the mouse in combination with the “Ctrl” or “Shift” buttons, or using the “Insert” button and the arrows on the keyboard.
5. Copy files to DVD
If you do not have an additional partition on the disk or a flash drive, then you can copy your files to DVDs. I recommend using DVD-R discs 16x. One such disk can hold 4.38 GB of data. Purchase disks based on at least 1 spare disk for every 5 disks.
Windows XP has a built-in disc burning tool, but, unfortunately, it is not suitable for us, since it does not have the function of checking the disc after burning. If you have a disc burning program (such as Nero), you can use it. We will use a simple free program"Astroburn", which you can download below in the "" section. There is nothing complicated in installing the program, just run the downloaded file and click “Next” several times.
After that, insert a blank disc into the DVD drive and close the AutoPlay window if it appears. Find the Astroburn Lite shortcut on your desktop or Start menu and launch the program. After launch, a new project is automatically created. To add folders and files to a project, simply drag them into the program window.

You can also use the toolbar along the right border of the program window to add and remove files from the project.

If the volume of files added to the project does not fit on the disk, then delete files or folders from the project that exceed the size.

After you eliminate the excess volume, make sure that the “Check” checkbox is checked. I recommend setting the recording speed to 8x. Click "Start Recording".

Wait for the recording to finish and a message that everything was successful. If an error or freeze occurs during the disk burning process, try writing the files again to new disk. If the error occurs again, your DVD drive may be malfunctioning. Don't forget to write to the next disk the files that you removed from the project due to excess space.
6. Copy files to another computer
If you have a second computer or laptop, you can copy the files to it. This can be done using a flash drive in several steps. Or you can transfer files over a local network. We will not consider how to set up a local network in this article; you can look for this information on the Internet or ask a knowledgeable friend to help set it up. Let's assume that your network is already configured. Let's create a folder on the second computer and open access to it over the network.
6.1. Sharing a folder in Windows XP
First of all, make sure that there is enough space on the computer drive where you want to copy your files (for example, on the “D” drive). To do this, right-click on the selected drive and select “Properties”.
Now create a new folder where you want to copy your files. For example, “Backup”, which means backup. Right-click on this folder and select “Sharing and Security.”

If the message “If you understand...” appears, as in the screenshot below, left-click on it.

If the message “Enable public access to files" as in the screenshot below, select "Just enable file sharing" and click "OK".

Now check the boxes “Share this folder”, “Allow editing files over the network” and click “OK”.

A hand should appear under the folder, as in the screenshot below. This means that it is publicly accessible.

6.2. Sharing a folder in Windows 7
Right-click on the folder you want to share and select “Sharing\Specific Users...”.

Enter "Everyone" and click the "Add" button.

Click on the line that appears, select “Read and Write” and click the “Sharing” button.

The folder is open for public access and you can already copy files to it over the network.
6.3. Copying files over a network
Copying files over a network is no different from copying files from one folder to another. Select the folders and files that you want to copy with the mouse, right-click on any of the selected elements, select “Properties” and make sure that they will fit on the disk of the second computer on which you created the folder with network access.
Click on any of the selected elements and select “Copy”.
Now open File Explorer using the My Computer icon or any folder. In the left pane, find “Network Neighborhood” and find in it your second computer with the network folder you created. I already had a "Backup" folder where my backups are located.

Right-click either on the folder itself or in any empty space and select “Paste.” The files will be copied over the network as if they were in a regular folder. Wait for the copying to finish; if there is a large volume of files and a slow network, it may take a long time.
7. Copy files to the cloud
If your disk does not have a second partition (for example, drive “D”), a large flash drive, a DVD drive and a second computer, or there is not enough free space, but there is fast internet, then you can back up your files to cloud storage on the Internet.
There are many paid and free services that provide their own disk space for storing user files. Here we will consider only the simplest and free means. These are Google Drive, Yandex Drive and Cloud Mail.ru. “Google Drive” provides 15 GB for free, “Yandex Disk” – 10 GB, “Mail.ru Cloud” – 100 GB. Additional space can be purchased for a small monthly fee. But no one bothers you to register several accounts in these services, which is not so convenient, but it is free.
Let's consider Cloud Mail.ru, since this service provides the largest amount of free file storage. In order to use this service you need to register on the website “mail.ru”. If you already have Mailbox to “mail.ru”, then you do not need to register. Go to the “” website and, if necessary, enter your username (mailbox) and password. In order to copy your files to cloud storage, click on the “Download” button and select the required files. Or simply drag and drop your files and folders into the browser window using your mouse. Click on the picture to enlarge.

To download the files back, click the “Download” button. In this case, all or previously selected files will be downloaded in one ZIP archive, which can be unpacked after downloading. By right clicking on specific file it can be downloaded separately.
The Mail.ru cloud has a maximum file size limit of 2 GB and uploading to it is slower than to Google Drive () or Yandex Drive (). Otherwise, these services work similarly, so we will not consider them.
8. Backup browser bookmarks
Make a backup of your bookmarks in the browser you use. These bookmarks can be restored to any browser after Windows reinstallation. If several people use the computer and each has their own account, then this needs to be done for each user.
8.1. Internet Explorer browser
Go to the “File\Import and Export...” menu.

Select Export Favorites.

Click the "Browse..." button, indicate where you want to save the file and its name. I recommend saving it in a folder with all other backups, for example, “Backup”.

8.2. Browser Mozilla Firefox
Use the “Show all bookmarks” command or the keyboard shortcut “Ctrl+Shift+B”.

Then “Import and backups\Export bookmarks to HTML file.”


8.3. Google Chrome browser
Open the “Bookmark Manager” through the “Bookmarks” menu or using the keyboard shortcut “Ctrl+Shift+O”.

Use the "Manage\Export bookmarks to HTML file" function.

Select a location, file name and click Save.

8.4. Opera browser (up to v.12)
If you are using the Opera browser on an old engine (up to v.12 inclusive), go to the menu “Opera\Bookmarks\Manage Bookmarks...” or use the keyboard shortcut “Ctrl+Shift+B”.

From the File menu, select "Export as HTML...".

Select a location, file name and click Save.

8.5. Opera browser (v.15 and higher)
If you use the Opera browser on the Chromium engine (v.15 and higher), then, unfortunately, it does not have a function for exporting bookmarks. Instead, use the “Opera\Sync...” function.

Click "Create an account!"

Enter your address Email(e-mail), New Password for Opera bookmark synchronization service, verification code and click “Create account”.

After this, your bookmarks will be synchronized with the Opera server. Write down your username and password in text file, where the rest of your passwords are stored, or in a paper notepad. They will be useful for restoring bookmarks after reinstalling the system.
9. Accounts and passwords
Rewrite account passwords (Skype, mail, social networks, etc.). If you haven't done this yet, now is the time. I recommend creating a text file in Notepad and writing everything down in it. If you write to notebook, then write in detail and legibly, otherwise you won’t understand what’s what later. I do not recommend using separate leaves for this, they tend to get lost.
10. Internet settings
Internet connection parameters, if they exist, should have been provided by the provider when concluding the contract. They can be written down in the contract itself, an appendix to it, or simply on a separate sheet. If the computer is connected via a router, then most likely no additional settings are required. If you have a laptop or computer connected via Wi-Fi, then you only need a password to the Wi-Fi network.
In any case, it doesn't hurt to check the network card settings.
10.1. Internet settings in Windows XP
Go to “Control Panel\Network Connections”. Right-click on “Local Area Connection” and select “Properties”.

Highlight Internet Protocol (TCP/IP) and click Properties.

If you set the parameters to be received automatically, as in the screenshot below, then there is no need to write anything down.

If the parameters are indicated as in the screenshot below, then write them down or take a photo.

These numbers will need to be put back in place after reinstalling Windows. If in network connections If you have others, then just in case, look at their parameters.
10.2. Internet settings in Windows 7
Go to the "START\Control Panel" menu.


Right-click on “Local Area Connection” and select “Properties”.

Highlight Internet Protocol Version 4 (TCP/IPv4) and click Properties.

If you set the parameters to be received automatically, then there is no need to write anything down. If the parameters are indicated, write them down or take a photo.

These numbers will need to be put back in place after installing Windows. If you have other network connections, then look at their parameters, just in case.
11. Program and game saving settings
Look at what programs you have installed and think about what files and settings you may still need and where they are located. Determine where the saves are for games that you have not completed and want to continue. They can be in the “My Documents” folder, in one of the user profile folders on the “C” drive. In Windows XP this is “C:\Documents and Settings\ Username", in Windows 7 - "C:\Users\ Username" Sometimes the settings are saved directly in the folder with the program or game in the folder “C:\Program Files\ The name of the program" If you don't find it, enter in Google search or Yandex "settings" the name of the program" or "save name of the game».
There is a very convenient program “Migration Wizard” (“Transfer Wizard”), with which you can transfer program settings and game saves from Windows XP, 7 to Windows 7, 8. When restored, they will automatically go to the desired folders.
To make sure you don't miss anything, turn on showing hidden files and folders.
11.1. Enabling showing hidden files in Windows XP
Open File Explorer using the My Computer icon or any folder. Go to the “Tools\Folder Options...” menu.

Switch to the “View” tab, select with the mouse the very bottom option “Show hidden files and folders” and click “OK”.

11.2. Enabling showing hidden files in Windows 7
Open File Explorer using the My Computer icon or any folder. Go to the "Organize\Folder and Search Options" menu.

Switch to the View tab, scroll to the bottom of the window, select Show hidden files, folders and drives and click OK.

12. Using the Migration Wizard program
Next, we will look at how you can backup files in the Migration Wizard program. You can download it below in the “” section. There are versions for 32 and 64 bit Windows. Windows XP on the vast majority of computers is 32-bit.
There is nothing complicated in installing the program, just download the file from the “ ” section, run it and click “Extract”. Find the Migration Wizard shortcut on your desktop, launch the program and click Next.

Select "External drive or USB device...".

Select "This is my source computer."

Wait while the program scans and displays the file sizes in user profiles.


Pay attention to the folders in which program and game settings are stored.
Windows XP
"C:\Documents and Settings\Username\Application Data"
"C:\Documents and Settings\Username\Local Settings\Application Data"
Windows 7
"C:\Users\Username\AppData"

In my case, these folders only contain browser settings (Google, Mozilla and Opera), and since I already backed up my bookmarks, I don't need anything else here. But I found a save for the game “Borderlands 2” in the “My Documents\My Games” folder, which I did not complete. Also in the “My Documents” folder were projects from the video editor “Pinnacle Studio”. To save this data, I checked the appropriate folders.
Please note that I have not highlighted the Favorites folder because we have already saved bookmarks from the browser " Internet Explorer" I also did not check the boxes for the personal files folders “Downloads”, “History”, “Books”, “My Pictures”, “My Music”, “Miscellaneous”, since we should have already copied these folders to a safe place. And since they can take up a significant amount of space, there is no point in putting them in the parameter transfer file.
We do the same for the “Administrator” user. Uncheck all the boxes and click “Advanced”.

In this user's "Application Data" folder I found the "uTorrent" settings.

This means that the user uploaded files using this program. I decided to save the settings for it and checked the “uTorrent” folder. In the “Local Settings\Application Data” folder I found folders for several more programs. “QIP” – stores settings and message history of a popular exchange program text messages. “Skype” – stores settings and photos and other files received from users. “Wargaming.net” – we save the settings of the popular game “World of Tanks”, since we will reinstall this game on this computer In addition, saves for two more games were found in the “Documents - Administrator\My Games” folder.
We do the same for the “Common elements” item. Uncheck all the boxes and click “Advanced”.

Sometimes the necessary files may appear here.

In this case, in the “Program Files” folder I found the “ABBY Fine Reader” folder, in which I myself once saved the scanner settings file “Untitled.fbt”. I also found a folder on my HTC phone, which contained several dozen photos. If I had not done this, this data would have been irretrievably lost. But that's not all. On the “C” drive, the “Music” and “Photo” folders were ticked, which take up a large amount of space and which I had already copied to a safe place. Also, several folders on the “D” drive turned out to be selected, which there is no need to copy anywhere at all. Naturally, I unchecked all these boxes, otherwise I would have sat there until the morning and I still don’t know if there would be enough space on the flash drive...
After all the necessary folders are checked and unnecessary ones are unchecked, check how much data is left for archiving and click “Next”.

The volume of data should not be too large, since we transfer the bulk of files manually, and we use the “Transfer Wizard” only for program and game settings. In my case it turned out to be 448.5 MB. If you copy this file to a flash drive, it is not advisable that it exceed 4 GB.
In the next step, you can set a password for the transfer file so that no one can access confidential information. Usually this is not required, but if for some reason you decide to do this, then do not forget the password; without it, you will not be able to recover the data.


You will see the following window indicating the file name and where it is saved. Check this information so you don’t have to look for it later and click “Next”.

In the next window, click “Close” and the program will completely exit.

The Migration Wizard program has several features. It cannot be used to transfer settings from Windows XP to Windows XP, but only to an older one Windows version 7 or 8. The transfer may not work from 64-bit Windows to 32-bit, but usually this is not required. It is desirable that the language of the operating systems be the same, but in most cases this is the case.
If you need to reinstall Windows XP, try one of the following:
- “START\All Programs\Accessories\System Tools\Data Backup”
- “START\All Programs\Accessories\System Tools\File and Settings Transfer Wizard”
13. Links
Hard drive Transcend StoreJet 25H3 2 TB
Hard drive Transcend StoreJet 25M3 1 TB
Hard drive Transcend StoreJet 25M TS500GSJ25M 500 GB
 Good day!
Unfortunately, many users do not think at all about the safety of their data, even sometimes when they work on a document for days and weeks! But even a simple viral infection (or a failure in file system disk) - and files may disappear...
I hope that you came to this article not when everything was already lost, but prematurely, in order to do it in time backup copy (in English - backup (backup)) your important data.
In this article, I will show, using the example of one fairly convenient and functional program, how you can easily and quickly make a backup of your folders, files, and even an entire disk. Moreover, you can configure it so that it is created automatically, without your participation!
In general, a backup made on time keeps a bunch of nerve cells in place, saves time, and makes you calmer ☺.
So, let's begin...
Advice: by the way, if we are talking about ordinary files, then it is enough to simply copy them to a third-party storage device as a backup copy. This, of course, has its inconveniences - but that’s something!
What you need for work
1) Special program(s)
EaseUS Todo Backup Free
![]() Official site:
Official site:
A free and very convenient program that allows you to easily create backups of anything and everything (documents, folders, disks, etc.). The program captivates with its simplicity and reliability: in just a few mouse clicks, you can arrange everything (below, in the article I will show examples of how all this is done).
Additional features: cloning disks (including system disks), the ability to configure schedules, creating an emergency flash drive (if Windows OS suddenly fails to boot), viewing and selecting files that you will restore from a backup.
Among the shortcomings: there is no support for the Russian language yet (although the developers are expanding the language environment, soon it will be our turn ☺).
2) Flash drive or external HDD
It’s best to make a backup on some external media(which will quietly lie aside from the computer/laptop, and will help out if something happens). Just imagine - if you make a backup copy on the same disk that you use - then if it breaks (for example) - this backup will not help you in any way.

A flash drive or external drive (even better) should be of such a size that it can accommodate all your documents and files that you want to save. Let's say if you have system disk 60 GB, and you want to make a backup copy of it, then you need a flash drive (disk) of at least 80-90 GB!
Making a disk backup
The first thing you need to do is click the “System Backup” button, located in the top menu of the program (see screenshot below).

EaseUS Todo Backup: making a backup of the system disk
- select your system drive (number 1 in the screenshot below);
- indicate the location where you will save (number 2 on the screen below. Personally, I recommended and recommend that you always save to a third-party storage device, for me it is an external hard drive);
- Plan name: here you can set the name of your backup: it can be anything, as long as you remember what you have saved there, for example, in a month or two;
- Description: description of your backup (same as the previous one, can be anything);
- Schedule: if you need to make backups regularly, you can configure it once, and then the program will do it automatically. By the way, a screenshot of the schedule settings is given below;
- Proceed - button to start the operation.

System Backup - settings (description, see screenshot)
As for the schedule, the program implements it quite well. You can set everything in 2-3 mouse clicks: specify how many hours you want to do it (daily, weekly, monthly), then select the days and select the time. In general, everything seems to be simple...

Schedule (for those who want to back up regularly)
After setting the basic parameters, in the next step, the program will ask you to specify the drive (and folder) where the backup will be saved (by the way, it will be a regular file).

Afterwards, the program will begin creating a backup copy. Pay attention to "Estimated time remaining" - this is the remaining operating time. In my case, for a ~60 GB disk the program took about 16-17 minutes of time. Pretty fast.
Note: The external drive was connected to a USB 3.0 port.

The disk backup is ready: the name of your backup copy will now be displayed in the main program window, opposite it there will be a button for recovery (Recover, see screenshot below).

EaseUS Todo Backup - system disk backup is ready!
Backup folders and files
This is done, in principle, in the same way as creating a copy of the disk (which was made in the previous step). To get started, launch the utility and click the button "File Backup" .

- Select the file or folder: Folders (or even entire drives) you want to add to the backup. For example, I selected the "My Documents" folder;
- Destination: where to save the backup (preferably on a third-party storage device);
- You can set any name and description ( Plan name, Description);
- Schedule: if necessary, ask (I usually never specify - when I decide to make a backup, I do everything manually ☺);
- Proceed- start of the operation.

In general, the program quickly created a backup of my documents. By the way, the backup file itself can be recorded later on another medium (or even uploaded, for example, to a Yandex disk, somewhere in the cloud).
Reference!
Cloud storage: what, how, why? How to connect a cloud drive to Windows, Android - secure file storage in the cloud, available anytime, anywhere -

Recovery example (and overview of files in backup)
And so, you lost some file (or even a folder), and you decided to restore this data from backup.
Launch the EaseUS Todo Backup program and click on the button "Browse to Recover"(view backup).

EaseUS Todo Backup - see what is in the backup

Browse to Recover - select the backup you want to open
Next, you can view your backup: folders, files, everything is shown in a tree view (clear and simple). All you have to do is check the boxes which folders you want to restore (number 1 on the screen below), select the folder where you will restore the selected data from the copy (numbers 2, 3 on the screen below), and, in fact, start the process - by clicking on the button "Proceed" .

After some time, the folders and files will be restored. Convenient and fast...

Well, the last thing I wanted to dwell on in this article. I recommend that you create one more thing: an emergency flash drive, in case your Windows suddenly does not boot. After all, something needs to be loaded, where you press a button and the system disk will be restored ☺!
In this case, EaseUS Todo Backup provides for the creation of an emergency disk/flash drive. The whole process is very simple and does not take much time (in my case it took about 10 minutes).
Click tool "Tools", and select "Create Emergency Disk"(creating a rescue disk).

- choose to create a WinPE disk (compatibility of the Linux version of the bootloader is much worse: your mouse may not work, USB ports will not be visible when you boot from this emergency flash drive);
- indicate the correct letter of the flash drive (see screenshot below);
- press the "Proceed" button (start recording).

By the way, the program will automatically download the required disk image from the official Microsoft website and write it to your flash drive. Convenient enough.

The flash drive was successfully written!
How to boot from this flash drive and work with the EaseUS Todo Backup program
Well, in general, in most cases it is enough to call the so-called Boot Menu, in which you can select the device from which to boot. As another option: you can configure the BIOS accordingly (which takes longer and creates some difficulties for beginners).
Information!
BIOS setup topic and Boot call The menu is quite extensive. Most often, it is enough to press the F2, or Esc, or F10 button (these are the most popular) immediately after turning on the laptop/computer. But the treasured menu does not always appear...
Therefore, in order not to repeat myself here, below are several articles that will help you!
How to configure the BIOS to boot from a flash drive or disk (CD/DVD/USB) -
How to enter BIOS on a computer/laptop e -
Hotkeys to enter the BIOS menu, Boot Menu, restore from a hidden partition -
Depending on the device: the call can occur in different ways: on my laptop there is a special button for this - you turn on the laptop by clicking on it, and the desired menu appears. Comfortable!

IN boot menu An emergency flash drive should appear (which we created a little earlier in the article). Select it and continue downloading.

If the flash drive was written correctly, with BIOS settings there are no problems - then you should see approximately the same EaseUS Todo Backup program window as if you had launched it from Windows. To get started, click the button "Browse to Recover" .

Browse to Recover - browse connected drives and view available backups

Actually, all that remains is to start the recovery (example below in the screenshot).

To start recovery, click the "Next" button.
It is worth noting that if we are talking about a backup copy of a folder (files), then you can also view the contents of the backup and restore not the whole thing, but only certain data (example below).

View files in backup - can only be restored selectively!
Actually, that’s all I wanted to tell you today ☺.
PS: all users are divided into two types: those who have not yet made backups, and those who have already started making them...
Anyone can suffer such misfortune: at some point the hard drive fails, malware deletes files, or they disappear due to some unexpected system error. If you don't create backups, you can lose your files forever.
Creating a backup copy is a completely simple process. There are the most different ways backup, and this article will help you figure out which method is right for you and which files really need backup.
What to copy first
Of course, personal files. If something goes wrong, you can always reinstall the operating system and download again necessary programs, but personal data cannot be restored. You should regularly back up documents, photos, videos and any other private information stored on your computer. If you spent a lot of time transferring information and files from CD or DVD media, then you can also make a backup for such files so as not to do the same painstaking work again.
You can also create a backup copy of your operating system, programs, and system settings. It is absolutely not necessary to make a backup of these files, but this will make your life much easier if your hard drive suddenly fails. But a complete backup of the entire system is necessary if you like to change system files, edit the system registry and regularly update equipment. There are a variety of ways to back up data, ranging from using an external drive to a remote server. Of course, each method has its pros and cons.
Backup to external storage
if you have external USB drive, then you can make a backup directly to it using the built-in backup functions. To do this, use “File History” in Windows 10 and 8. In Windows 7, look for “Windows Backup.” On Mac devices, use Time Machine. Just periodically connect the external drive to your computer and run the backup tool.
pros: quickly and angrily.
Minuses: If something happens to the external drive, the copy will also be lost.
Internet backup
If you want to be sure that your files are safe, you can back them up using a service like Backblaze. This is an online backup service. In addition to Backblaze, there are also Carbonite and MozyHome. For a small monthly fee (about $5 per month), these programs automatically back up your files to the service's web-based storage, running in background on your PC. If files are suddenly lost, they can always be returned.
pros: Online backup protects users from any problems that may happen to the files.
Minuses: These services are usually not free. Additionally, the first copy may take much longer than with an external drive, especially if you have a lot of files.

Using a cloud service
Some will say that cloud technologies They aren't technically backup services, but many people use them for that purpose. Instead of storing files on your computer's hard drive, you can upload them to a service like Dropbox, Google Drive, Microsoft OneDrive, or anything similar. If something happens, you will have copies of your files in this service and on all connected devices.
pros: This is a simple, fast and in most cases free method. Storing your data online allows you to protect it from almost any negative scenario.
Minuses: Most cloud services only provide a few gigabytes of storage, so this method only works if you don't have a lot of files to back up, or if you're willing to pay for more storage space.

Although backup programs (the same Backblaze, for example) and cloud services They are used almost identically, they work completely differently. Dropbox is for syncing files between PCs, while Backblaze and similar services are for backing up large numbers of files. Backblaze will store multiple copies different versions files, so you can restore a file in the same way you would roll back your system to a specific restore point.
Cloud services are free for only a small number of files, while Backblaze allows you to back up as much data as you want for a relatively small fee. But Backblaze and Carbonite have a significant limitation that you should keep in mind. If you delete a file on your computer, after 30 days it will be deleted from your online backups. That is, after this 30-day period you will not be able to restore deleted file or him previous version. Therefore, be careful.

So what should you choose? Ideally, of course, it would be nice to use at least two of the methods presented. An excellent solution would be to store data both locally and online. Onsite backup literally means storing data in the same geographic and physical location where you are. That is, this is the option when you create a backup copy on an external drive and store it at home, where your computer is also located.
Online data storage (offsite backup) is the creation of a backup copy on an online server like Backblaze or Dropbox, which is stored in some other location. This option does not necessarily have to be paid, but it may take a little longer than with a local backup. However, the level of reliability is much higher.
You can store your files in Dropbox, Google Drive or OneDrive and back up regularly to an external drive. Or you can use Backblaze for online backup and History Windows files» to create a local backup. There are plenty of ways to use these options in tandem, and it's up to you to decide how to arrange it all. Just make sure your data protection strategy is strong and includes both online and local data storage.
Process automation
This may seem difficult only at first glance. The more automated the process of creating backup copies is, the more often the backup procedure will occur. That is why, instead of manually copying files, it is wiser to use an automated tool that only needs to be launched and configured once. This is the benefit of programs like Backblaze.
If you set up an online backup, the program itself will automatically perform it every day. If you copy manually to an external drive, you may soon get tired of making backups. Therefore, in this case, process automation is worth the effort.

If you don’t want to pay and rely primarily on local backups, then at least try using a file synchronization service in addition: Dropbox, Google Drive, Microsoft OneDrive or any other. That way, if you ever lose your local backup, at least you'll have an online version of your files.


