You can mute GLONASS tracking using jammers on the website jammer.su
The main task of transport monitoring is to optimize logistics schemes and reduce fuel costs. However, the greatest fuel savings for the owner of a vehicle is not due to indefinite “optimization”, but due to the fact that monitoring allows you to monitor fuel drains and stop “leftists”. Drivers responded by trying to spoof GLONASS". In fact, these attempts are divided into two types: hide the movement of the car, and hide the fuel drain. In the first case, navigational equipment is affected, in the second - fuel meters.
How to get rid of GLONASS tracking
Drivers come up various ways blocking the transmission of information about the movement of the car, depending on their knowledge of technology and electronics. There are both frankly barbaric techniques - damage to equipment - and more advanced ones, using additional equipment.
1. Damage to the GLONASS antenna.
The most primitive way that drivers go is to influence the antenna. She's in the public eye and she needs good signal from 3 or more satellites to report the location of the car. You can damage the cable - this is done by piercing the insulation with a needle and breaking the wiring. But such damage is easy to identify and apply sanctions for sabotage. Some drivers simply cut the cable, and then come up with the excuse “broke off” or “frayed”. Moreover, this method is useless in those terminals that are able to receive signals without an antenna.
2. Shielding of the GLONASS antenna. You can try to shield the antenna with metal, for example by wrapping it in foil or a thicker metal sheet. There are attempts to disrupt signal reception with a magnet, but as a rule they are unsuccessful.
3. Impact on the GSM antenna. A completely useless event, because. the terminal will still collect information about the movement, and the operators will quickly identify the machine that has stopped transmitting the signal, and conduct an inspection. After the return of communication, all information about the route traveled will be transmitted to the destination.
4. Shielding the GLONASS terminal with metal sheets is a useless exercise if the antenna cables are still undamaged from the case.
5. Power off the terminal from the onboard power supply. It seems to drivers that this measure will get rid of all problems with navigation, but firstly, the failed terminal will be checked and restored to working order, and secondly, most terminals are equipped with their own batteries and will be able to record the path traveled for several hours after a blackout.
6. Damage to the GLONASS terminal is a barbaric and irrational act, which instantly allows you to identify the one who did it, fire him, but also deduct the cost of the terminal from the salary. Damage is carried out by various means, from a primitive mechanical breakdown to more sophisticated methods: flooding with water, hitting with stun guns or grounding the metal case of the terminal. In all cases, the violation is easily determined, as well as the moment of damage. That is, the culprit is easily detected.
7. Attempts to introduce GLONASS terminal into microchips.
In fact, they are excluded, since the body is sealed and any introduction will not go unnoticed.
8. Removing or damaging the SIM card.
Advanced motorists know that messages about the movement of the car are transmitted over the GSM channel, which means that a telephone SIM card is installed inside the terminal. If it is damaged or pulled out, the signal will not be transmitted. Such a technique is similar to damage to a GSM antenna - i.e. completely useless, tk. information about the movement will be accumulated and will be transmitted at the time the card is returned to its place.
9. Use of GPS-GLONASS jammers.
Domestic and Chinese craftsmen quickly responded to market demands and offered portable electronic jammers for satellite signals. Such a device, powered by a cigarette lighter, leads to the fact that the terminal sends an alarm message "Satellite signal lost" to the dispatch center. The use of a jammer is the most "intelligent" technique, but requires the same intelligent approach in use, since periodic "losses of signal" on one machine will ultimately arouse the suspicions of dispatchers. In addition, as a rule, a jammer successfully blocks one frequency, and if the terminal is dual-system: GLONASS / GPS, then two jammers are needed or the device will be useless.

There are three types of fuel meters: flow, submersible and ultrasonic. Flow-throughs are effective only in summer, and in winter they create a lot of problems for drivers due to low-quality fuel and blockage of the fuel line at the location of the meter impeller. Therefore, only ultrasonic and submersible meters are now used. All of them estimate the amount of fuel in the tank.
How to trick an ultrasonic fuel meter.
Ultrasonic meters are installed under the tank, and the fuel level is recorded through the bottom using ultrasound. Such a counter can be disabled by an electric shock, but a violation of its operation will be immediately detected. Drivers came up with a more sophisticated method - to attach a magnet to the meter case. In this case, the voltage rises in the meter, and it starts to show false information: an increase and decrease in the fuel level while driving. Thus, the owner of the vehicle loses confidence in the meter readings and the driver opens up room for fraud.
How to cheat a submersible fuel meter
Submersible meters look like a tube that is installed vertically inside the tank. Such a meter determines the fuel level very accurately and is very reliable - it is resistant to current, and reliable sealing allows it not to be afraid of water. Some drivers try to disable it by pouring hot water during frost - but this action does not affect its performance. Therefore, the only and most rude way to break the meter readings while maintaining its performance is to bend it inside the tank. Drivers can do this with a metal bar through the filler neck. Some even try to remove the tank and bend its surface so that the counter is bent inside, but such an effect is easy to see from appearance tank. Moreover, the meters are not installed end-to-end, but there is a gap of about 5 cm between the bottom of the tank and the meter tube. A tank bent by this amount will be too noticeable with its crumpled appearance.
Return drain
The only, so far, win-win option for draining fuel with a meter installed is saved on diesel cars. On them, the drain of the "return" is practically impossible to control. An embedded tap into the return fuel line will allow the driver to safely drain part of the fuel returned to the tank. The meter will show an increased consumption, but it will not be possible to remotely determine the reason for it. It will be possible to identify a discrepancy only if you compare the readings of two meters on different cars, or accompany the driver on the route and monitor fuel consumption.
How to fool GLONASS for sure
In conclusion, it should be said that the successful "deception of GLONASS" and fuel meters lies in the mutual interest of three categories of workers: drivers, garage managers and dispatchers. Only their joint coordination will make it possible to work out such fuel theft schemes, in which all employees will look like victims, unfairly accused because of constantly making mistakes, low-quality and useless, from their point of view, GLONASS equipment.
P.S. Unattainable today for ordinary drivers, but theoretically possible means of deceiving GLONASS could be the technology used by the Iranian military against an American unmanned aircraft. The Iranians, with the support of Belarusian technical specialists, jammed the signals of the real GPS and began to transmit false data to the drone, which led it to the Iranian airfield, although the car was sure that it was returning to the American base. Those. there is already a technology for replacing a satellite signal with another one - a local one. But for now, it's too complex to be used for something as small as stealing fuel.
Geolocation is the process of finding the iPhone's location. Unfortunately, the importance of geolocation is usually underestimated, despite the fact that without it it will not be possible to use the navigator, attach geotags to photos, and find them using the function of the same name. Users are more aware of the negative characteristic of geolocation - “gluttony”: by disabling the function, you can significantly increase the duration battery life gadget.
Fortunately, the procedure for activating / deactivating geolocation is quite simple - you can turn it on while using the navigator, and keep it off the rest of the time.
The user meets a request to activate geolocation during the initial setup of the iPhone and, as a rule, out of ignorance confirms it. Therefore, the issue of disabling geolocation is more topical than enabling it. You need to deactivate the function like this:
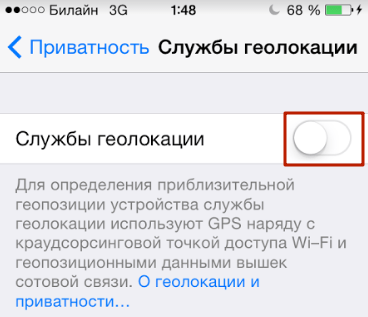
Step 1. AT " Settings» find the section « privacy" (on some versions of iOS - " Confidentiality") and go into it.
Step 2. Proceed to the subsection " Location Services- He comes first on the list.

Step 3. Switch the toggle switch " Location Services» to inactive position.
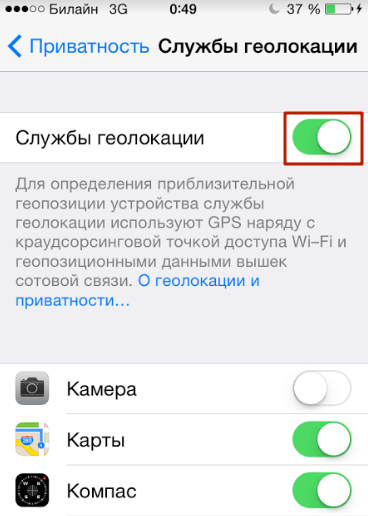
Step 4. Confirm your intention to deactivate geolocation - click " Switch off».

Please note that the iPhone has flexible settings: you can allow some applications to use geolocation, and prohibit others. To do this, you need to adjust the sliders located in the block below.

For example, with the configuration as in the picture, you will be able to use navigation, but geotags will not be attached to your photos.
With flexible settings, the main toggle switch " Location Services' must be enabled.
Do I need to disable geolocation of system services?
Subsection « System Services» is located at the very bottom of the block with a list of applications that need geolocation.
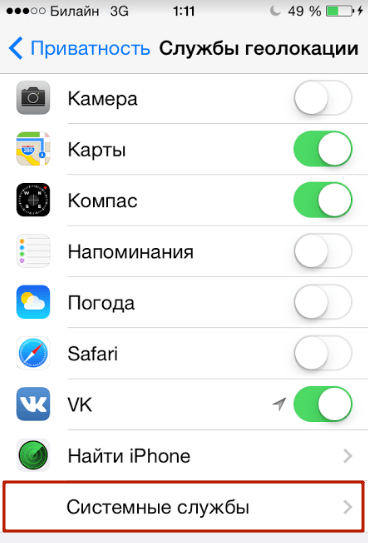
A user who visits this subsection will see the following:

Before deciding whether to disable geolocation for system services, you should figure out what functions are designed to perform at least some of them.
The listed system services are common to most iOS versions. There is no need to describe all the services - and so it is clear that their main goal is to collect confidential consumer preference data and sending information to Apple. People who claim that Americans are watching Russians through smartphones are not so far from the truth.
If you do not want Apple to update its statistical bases by tracking your movements and purchases, switch the toggle switches in the " System Services» to inactive position. It is recommended to do this for all "Apple": There is no benefit to the owner of the iPhone from the services, but the charge is consumed faster because of them.
How to enable geolocation on iPhone?
The algorithm for how to enable geolocation on an iPhone differs only slightly from the method of disabling described above. The user also needs to follow the path " Settings» — « privacy» — « Services geolocation". In the last section, he will see that there is only one slider (the main one), and there is no list of applications using geolocation.
It is necessary to activate the toggle switch, then disconnect from geolocation those applications that do not really need this function.
Are geolocation and GPS the same thing?
Users who believe that geolocation and GPS are synonyms are mistaken. Geolocation is a general term associated with locating a device; GPS is a trademark of the American satellite system navigation. Most often, geolocation uses GPS technology - hence the misconception about the equivalence of concepts.
However, in order for geolocation to be available, it is not at all necessary to turn on GPS - there are other ways to calculate positional data:
- Via Bluetooth. The location of the object is determined using special beacons beacon, which are located in public buildings - airports, hypermarkets. In terms of accuracy, this technology is inferior to GPS, because it provides a reliable result only if the object is stationary.
- Station based mobile communications . The smartphone knows from which station a GSM signal is sent to it and where this station is located. Therefore, using a special application containing a database of stations, you can use geolocation without GPS. Reliable results using this method can be achieved in megacities where the network coverage is high, but in small cities it is problematic to determine geolocation through stations.
- Based on the Earth's geomagnetic field. Navigation based on the geomagnetic field of the planet is the idea of Saratov scientists. Each point on the Earth has a unique set of characteristics that can be used to determine the location of an object (including an iPhone). The technology is still only being tested, but it is already receiving large advances.
Despite the fact that geolocation and GPS are different concepts, and there are several ways to calculate positional data, on this moment quite accurate You can only determine the location of an object using GPS.
What to do if geolocation does not work?
If geolocation does not work, it is hardly a mechanical failure of any part of the iPhone (for example, the GPS module). Most likely, the malfunction lies at the software level. What to do if the function refuses to function?
Step 1. Proceed to the section " Location Services” and make sure that geolocation is activated for a specific application.
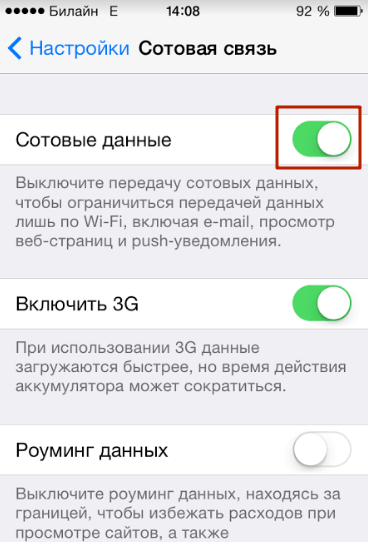
Step 2 Check if internet is enabled on iPhone. The network makes it possible to more accurately position the device. Go to the section " cellular » settings and make sure the Cellular Data slider is in the active position.
Step 3. If the above steps did not work, reset the settings after creating a backup copy (instructions for creating copies are located). Follow the path" Settings» — « Main» — « Reset” and select “ Erase content and settings».

With this reset, all data from the iPhone will be deleted.
You need to check if geolocation works on a “clean” smartphone, that is, before restoring from backup. If the function still does not work, you should contact the service.
More often than not, owners of jailbroken iPhones face problems with geolocation. Such users are recommended to install from the store Cydia tweet called libLocation: it is completely free and contributes to a better positioning of the hacked gadget.
Conclusion
If you don't know what is photo tags, and consider iPhone navigation to be superfluous, most likely, you do not need the geolocation function at all. It is recommended to turn it off - thanks to this measure, you can ensure that your gadget "lives" in offline longer. Do not forget about deactivation system services, which do not bring any benefit to the owner of the gadget, but the battery is planted faster.
You can talk about the benefits of GPS on a smartphone for a long time, so we will not do this. But recall that GPS is not only accurate (well, almost) localization and routes to anywhere, but also a lot of mobile applications, which literally cannot live without data about your location and constant tracking of your movements (often extremely intrusive), and which, in addition to this, actively “eat” the smartphone’s battery.
In general, GPS on the iPhone is needed, but sometimes it would be nice to turn it off.
Another thing is that most users are not able to really turn off GPS on the iPhone. Everyone is doing how? They simply activate the flight mode, in which the wireless modules of the smartphone do not seem to work.
In Airplane Mode, the iPhone cannot send signals (as is commonly believed) that could interfere with aircraft electronics, but the GPS receiver is a passive radio, that is, it only receives signals and, unlike WiFI, 3G, LTE and Bluetooth, does not broadcast anything . However, in this mode, the GPS on the iPhone does not turn off, and all sorts of programs take advantage of this. Of course, without a smartphone connected to the Internet, it is not so easy for them to determine your coordinates, but any navigation application with an offline maps function will use GPS, as they say, to its fullest.
But if for others wireless modules Since the iPhone has toggles (in the Control Center), you will not find such a switch for GPS, so turning off GPS on the iPhone is not so easy. What if you need to turn it off? Well, for example, to save battery charge.
So, to completely disable GPS on the iPhone, do the following:
- to start, go to Settings ", further - in" privacy where we find Location Services «;
- tap on the switch located next to it and move it to the “ Off ”(it will turn gray from green).
Everybody! You were able to disable GPS on iPhone.
Now all applications installed on your smartphone, including Apple Maps, will not be able (at least officially) to use your location data.
But you also have the option to turn off GPS on the iPhone not for all wholesale programs, but only for some. To do this, go to the section Location Services » settings applications, we see the list and in it we disable access to GPS only for certain programs.

By tapping on the slider, you will see a small menu in which, for some applications, you can choose to turn off GPS modes. " Never " means that the application should not use the GPS in your iPhone at all, " When using the program » — GPS is activated only if the application is active, « Always "- GPS is used by the program all the time, if you have not disabled it in the way described above for all applications.
Incorrect operation of the GPS module is a fairly common problem for Android devices. The system can connect to satellites, but navigation will still not work. In some cases, the defect is associated with a breakdown of the hardware of the gadget, but most of the situation is solvable. software methods. The following describes what to do if GPS does not work on Android.
For self-diagnosis, take the test. The virtual assistant will determine the malfunction and tell you what to do.
GPS Diagnostics
Problems with GPS
The first thing to do if the GPS sensor is not working is to restart the smartphone and check it with an antivirus. Perhaps, RAM device is full, and there are not enough processor resources to activate communication with satellites. Or there was a glitch in the operating system.
First, let's define how the navigator works on the phone. Yandex.Maps or navigation from Google communicates with the system's satellites and requests data about the user's current location. Based on the information received, an optimal route is built or public transport is selected. If the GPS module ceases to function, normal operation of navigation is impossible, even with the use of A-GPS technology. The main causes of failure are usually software problems, but in some cases the source of the failure is the failure of a hardware module.

On Android, location services do not work if the settings are incorrect. Also, the cause of the defect may be the installation of incompatible firmware or the lack of necessary drivers.
The navigator from Google or Yandex does not work well even with a weak satellite signal. It is worth remembering that programs do not always correctly display the location, and you should not rely on the system when hiking or off-road. To troubleshoot, we will analyze the causes and solutions of popular problems.
Reasons for no signal
There are two main groups of faults: hardware and software. The former are eliminated by qualified specialists in service centers, while the latter can be fixed at home.
- Hardware - a component is able to fail after a mechanical impact on the device case, for example, a fall or a strong blow. The cause of the breakdown can also be the ingress of liquid on the main board, followed by oxidation of the contacts.
- Software - malware infection software, incorrect firmware or update failures - all of these malfunctions can damage the location driver.
Incorrect setting

Proper configuration of the smartphone parameters is the key to the correct operation of the GPS system on Android.
- If Android does not find the location, go to the device settings, the General tab, and then open the Location and modes.
- On the Location tab, select your preferred location method. If set to Satellites Only, Android will not use A-GPS technology, which collects data from nearby cellular and Wi-Fi networks to improve location accuracy.
- Try setting the "Mobile networks only" mode and check the operation of the cards. If navigation turns on, there is a problem with the driver or hardware.
- When the GPS on Android does not turn on (the system does not respond to switching the option) - the problem is probably in the firmware. Complete full reset settings or contact the service center.
- To reset location settings, click on the "Backup and reset" tab, then tap on "Reset network and navigation settings." Sign in to Google account for confirmation.
Important! All saved passwords from points WiFi access, as well as cellular network data will be deleted.
The described method helps to eliminate most of the problems with the software part.
Wrong firmware
The consequences of careless firmware on Android can be quite unpredictable. Installing third-party versions of the OS is performed to speed up the gadget, and as a result, the phone modules cease to function.

If you decide to reflash the device, download the firmware files only from trusted forums - XDA and w3bsit3-dns.com. Do not try to flash your smartphone with an OS version from another phone, as the drivers necessary for operation may stop functioning. If the device has turned into a "brick", perform a hard reset.
- Hold down the volume up and lock buttons for 5-7 seconds. When the Android logo appears on the screen of the turned off gadget, release the "Volume Up".
- The recovery menu will load. Select "Wipe Data/Factory Reset", confirm Hard Reset.
- Tap "Reboot system now" to reboot your smartphone. The power-on setup will take a few minutes.
The method is suitable for devices with damaged firmware. The GPS module will restore functionality after switching to the factory version of the OS.
Module calibration
In some cases, it is necessary to perform a quick calibration of the device.
- Open the "Essential setup" application, you can download it for free from the Play Market.
- Click on the compass icon and place your smartphone on a flat surface.
- Tap the "Test" button and wait 10 minutes until the end of testing. Once completed, try enabling satellite navigation.
Hardware problems

Chinese cheap smartphones (Leagoo, Oukitel, Ulefone and others) are often equipped with low-quality satellite communication modules. You can fix the problem by replacing the corresponding module in the service center. Malfunctions in work are shown both on Android, and on iOS phones.
It happens that the internal antenna falls off (a small thing on the board), which also affects the quality of satellite signal reception. Fixing it yourself is difficult.
Conclusion
If navigation on Android does not work or you cannot connect to satellites in open areas, determine whether the cause of the defect is in the gadget parameters or the electronic board has failed. Repair of hardware faults should be carried out only in official service centers.
Video
All modern Android smartphones and tablets are equipped with a GPS module. This allows these devices to be used as GPS navigators. In addition, the presence of a GPS module allows you to leave GPS tags on photos and use many other useful features. In this regard, many novice users are interested in how to enable GPS on Android. In this article, we briefly consider this issue.
Typically on Android GPS devices the module is included. But, if you previously disabled this function, and now you want to turn it back on, then you need to open Settings and go to the "Location" section.
At the top of the "Location" section there is a switch that is responsible for turning off and on GPS on Android.

If this switch is lit in blue, then the GPS is on. In addition to simply turning on the GPS, you can change the navigation mode. To do this, go to the "Mode. Device sensors.

In the "Mode" section, you can choose one of three modes for determining your location.

Consider these modes:
- High accuracy. In this mode, all available information is used to determine the location: data from GPS sensor, data obtained using wireless network Wi-Fi, as well as data received using mobile network. If you enable GPS in this mode, you will be able to determine your location with maximum accuracy.
- Save battery power. The operating mode assigned to the device. In this mode, the GPS module . Instead, location data is obtained from Wi-Fi and mobile networks.
- Device sensors. In this mode, only information from the GPS module is used.
Also in the "Location" window, you can enable or disable the use of data about your location Google services. To do this, go to the "Sending geodata" section.

The Submitting Data section has two additional sections: Submitting Location Data and Location History. Open each of these sections and disable (or enable) the use of your location data.