Do you want to make a ringtone out of a popular song for your mobile phone but don't know how to trim a song on a computer? After reading this article, you will be able to significantly expand your capabilities in digital music processing.
You, of course, know about the existence of huge collections of ringtones that you can download to your computer and “upload” to your phone. But sometimes you want something that is not in any collection. Then you have to roll up your sleeves, figure out how to cut a song on the computer and create.

To cut a song on a computer on your own, we need:
- Audio file of the original song;
- Computer;
- Free Audacity software;
- If the cut song will be used as a ringtone, then you will also have to take care of how the resulting file is copied to the handset.
How to trim a song on a computer using Audacity
Nobody forbids using the whole song as a ringtone, but as a rule it lasts several minutes, and for the call I would like to choose the most interesting moments. If they are far from the beginning of the composition, then you will almost never hear them. Therefore, users often want to not only use this or that song as a ringtone, but also cut out a certain section from it.
To do this, I suggest using the Audacity program, which can be downloaded for free from the official website. I note that this application has many functions that are far from limited to shortening musical compositions.

Appears at the specified location new file- this is the song cut off on the computer. Now you can copy it to your phone in a folder with ringtones or use it for other purposes.
Often there is a situation when you need to edit an audio file: make a cut for a performance or a ringtone for your phone. But even when performing some simple tasks, users who have never done anything like this before can have problems.
To edit audio recordings use special programs- audio editors. One of the most popular such programs is Audacity. The editor is quite easy to use, free, and even in Russian - everything that users need for comfortable work.
In this article, we will look at how to cut a song, cut or paste a fragment, and how to glue several songs together using the Audacity audio editor.
First you need to open the record that you want to edit. You can do this through the menu "File" -\u003e "Open", or you can simply drag the song with the left mouse button into the program window.

Now, using the Zoom tool, we will reduce the track step to one second in order to more accurately indicate the desired area.

Start listening to the recording and determine what you need to cut. Select this area with the mouse.
Note that there is a Crop tool and there is a Cut tool. We use the first tool, which means that the selected area will remain, and the rest will be deleted.

Now click on the "Crop" button and you will have only the selected area.

How to cut a fragment from a song with Audacity
In order to remove any fragment from the song, repeat the steps described in the previous paragraph, but now use the "Cut" tool. In this case, the selected fragment will be removed, and everything else will remain.

How to insert a snippet into a song using Audacity
But in Audacity, you can not only trim and cut, but also insert fragments into a song. For example, you can insert another chorus to your favorite song wherever you go. To do this, select the desired section and copy it using the special button or the Ctrl + C key combination.

And now move the pointer to the place where you want to paste the fragment and, again, press the special button or the key combination Ctrl + V.

How to stitch together multiple songs in Audacity
To glue several songs into one, open two audio recordings in one window. You can do this simply by dragging the second song under the first one in the program window. Now copy the necessary elements (well, or the entire song) from one entry and paste them into another using the Ctrl + C and Ctrl + V combinations.

We hope we have helped you to understand one of the most popular audio editors. Of course, we haven't mentioned only the most basic functions of Audacity, so keep working with the program and discover new possibilities for editing music.
Trim a song and set it as a ringtone, add it to a video clip, overlay it on a series of slides - this is not a complete list of tasks that may require trimming music file. You can do this with Audacity, which is easy to use and completely free.
Trimming a song in Audacity
To trim an audio file in Audacity, follow these steps:
- Download and install the software on your PC. The installation process is standard.
- Download the codec for the mp3 format and run the installation. (Insert from the folder)
- Now we download the song to be trimmed to the PC (if it is not downloaded). Open the program and click "File", "Open".
- Specify the path to the file.

- The file will be added to the program. Select the Zoom tool and reduce the track step to 1 second to more accurately determine the desired segment of the song.

- Now you need to listen to the song and remember the time intervals. For example, from 1.25 sec to 1.55 sec.
- We select the selected area and below we look at the exact time. To select, simply hold down the left mouse button and drag along the segment.

- After the area is selected correctly, click "Edit", "Copy". You can also copy using the keyboard shortcut "Ctrl + C".

- Now click "File", "Create a new project".

- Click "Edit", "Paste".

- The trimmed song has been added to the project. To save it, click "File", "Export".

- Select a file format from the list and enter a name. Click "Settings".

- In the new window, select the sound quality of the file. We recommend setting 320 bps.

- A new window will appear. We don't change anything in it. Let's save.

- The cut song is ready.
Greetings, dear readers of the blog site!
In this article, you will learn how to record audio on your computer, how to cut audio, how to merge audio, and how to edit audio.
We will do all this in the Audacity program. This program absolutely free, lightweight and very easy to manage.
So let's get started...
Download and install Audacity
To download the Audacity program, go to the official website of the developers.
Next, download the desired version. The yellow box contains a link to download the version of the program for operating Windows systems 8/7/Vista/XP. If you have one of these systems installed, then click on the link and download the program to your computer. If you have another operating system then click on the link below.
After the program installer file has downloaded, run it and follow the prompts of the installation wizard.
After that, a window will appear in which you will be asked to install additional plug-ins for the Audacity program to work. Install them too.

The program is installed and ready to go.
How to Record Audio in Audacity
In order to start recording, you need to press the record (REC) button and start speaking into your microphone. When you start broadcasting, a sound wave with a recording of your voice will begin to appear in the working window of the program.
If the recording is long enough, then you can click on the "Pause" button and by pressing this button again, resume recording. To end the recording, you need to click on the "Stop" button.

How to save an audio recording
After the record is ready, it must be saved. In order to do this, you need to go to the "file" menu item and select the "Export Audio" sub-item.

After that, a window will appear in which you need to select a location on your computer to save the audio recording file, as well as set a name and select a format.
The most popular audio format is MP3. Most people on the Internet use it, and therefore it is best to save an audio recording in this format.
After clicking the "Save" button, a window will appear in which you can fill in the metadata of your audio recording. This is done so that information about the audio is displayed in the file properties. Also, this information will be displayed in the player when listening to an audio recording.

This step is optional, so we can click OK right away.
 And we will open another window with a warning: "Audacity requires the file lame_enc.dll to burn MP3 files." The fact is that initially after installation, Audacity cannot save audio in this format, so you need to download the Lame_enc.dll file to your computer.
Click the "Download" button and we will see a page with instructions for installing the LAME file.


Let's run the downloaded file. The installation is simple: we constantly press the “Next” button, then we press the “Install” button and at the end we press the “Finish” button. That's it, the LAME file is installed and now we can save our audio recordings in MP3 format.
How to edit an audio recording
After the audio recording is ready, you need to edit it. After all, often when recording there are unsuccessful moments that I would like to cut out. This is very easy to do in Audacity.
In order to cut out an extra, unnecessary moment of the recording, you just need to select it with the mouse and press the button with the drawn scissors.

To make it easier to edit an audio recording, you can change the scale of the audio track. This is done using two buttons with drawn magnifiers and signs "+" and "-", respectively.
If you did something wrong while editing, deleted, for example, too large a section of the recording or cut out the wrong piece, then you can undo these actions. This is done using two buttons with drawn arrows.

Another important point. We can edit not only the audios we have recorded, but also any other audio files. For example, you want to cut a melody for a mobile phone ringtone.
To do this, create a new project: click the "File" menu item and select the "create project" sub-item. Drag the audio file with the selected melody into the window of the newly created project. And then we edit in the same way as I described above.
How to save a separate piece of an audio recording
Audacity has a great feature: you can save a piece of an audio recording you like. To do this, select the piece you need with the mouse and then click the "File" menu item and select the "Export Selected Audio" sub-item.
How to merge several pieces into one audio file
Imagine that we are faced with the task of merging two pieces of audio into one audio file. Let's call them conditionally: "piece 1" and "piece 2".
Create a new project and drag both pieces into working window programs. We will have two audio tracks, one under the other. Now select the track of piece 1 with the mouse, press the key combination CTRL + X (cut this piece).
Then we put the cursor at the end of the audio track of piece 2 and press the key combination CTRL + V (insert the cut piece).
That. we have one audio track that we can save into one audio file. That's so easy and simple.
Write in the comments what programs for creating and editing audio recordings do you use?
P.S. If something doesn’t work out for you, watch the video at the beginning of the article or ask your questions in the comments below, I will be happy to help you.
Audacity is a free cross-platform audio software. It has extensive functionality, with its help you can record vocals, musical instruments and other sounds, and then combine them into one work. You can use it to cut audio, and some users use it to create podcasts and mix music. You can download the Audacity utility in Russian on the official website.
What formats does it support
Among the supported formats there are such as: Ogg Vorbis, MP3, WAV, AIFF. This is far from full list. Audacity can work with sound in 16, 24 and 32-bit, as well as import MPEG Audio.
Interface Overview
The program has a standard interface for sound editors, top part there are recording control buttons, recording and playback volume, a variety of tools and settings for output devices. IN middle of the screen there is a sound diagram, in left side channel mixer. Below is the status bar.
How to record audio
Before recording, you need to select the device with which the audio fragment will be recorded, after that:

Instruments on the audio track
The audio track has a drop-down menu, you can call it by clicking on the arrow next to the name of the downloaded record. 
Let's get acquainted with its main functions:
- Name– allows you to assign a custom title to the selected track.

- Move Up– if there are two or more tracks, shifts the selected one up by one position:

- Wave– displays the signal as a function of amplitude over time.

- - Displays changes in time of sound waves, frequencies that make up sound and their intensity.
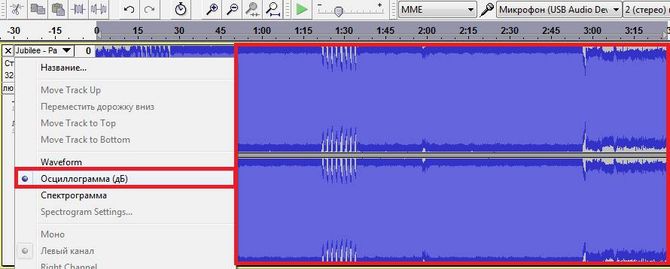
- – shows the frequency distribution spectrum.

- Mono— sets playback on the right or left channel.
- Left channel— sets left channel playback.
- — sets the playback of the right channel.

- Make stereo– turns the selected track and the track below it into stereo.
- – creates two mono tracks from one stereo.
- Format(Format) - sets the bit depth of the audio file (16, 24 and 32 bits).
- rate– sets the frequency of the project.

- Button "".
- “Solo” – when this button is pressed, only the selected track will be played.
How to cut a track
To start trimming music in Audacity, you need to select fragment holding the left mouse button (LMB) at the beginning of the audio recording, hold it until the end of the desired fragment. The following will appear at the top: 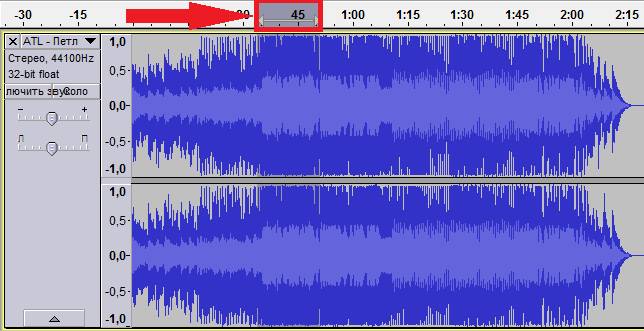
The fragment is selected, the next step is pruning. You can cut the track from both sides, leaving only what is selected, or you can cut this fragment:

Merge sound
To merge you need:

mixing
The settings on this panel provide control over the input and output parameters of sound cards. Both sliders will be located in the “-” position if the audio recording is not supported by the parameters sound card. Sometimes this is due to the fact that on the PC missing drivers, or audio device not too common.
Left slider is responsible for the volume of the output sound, and with the help of right the level of the input signal (microphone, line input, etc.) is adjusted. If distortion and noise occur during recording, you need to lower the level of the right slider.