Talking about the feather Windows installation, we will briefly describe the main stages of installing Windows 7 and focus on the most difficult aspects. Although reinstalling a modern OS is no more difficult than installing a software package, certain points still require clarification.
Booting from external media
To begin, insert the installation disc into the drive and restart your computer. If it started booting from the installation disk, that's good; if not, then you need to change the BIOS settings so that the machine first tries to boot from the optical media.
At the moment when the machine starts to boot, press the Del or F2 button on your computer keyboard. It depends on the brand motherboard, computer configuration, BIOS version and other factors. But typically, pressing one of these two buttons will open the BIOS settings screen.
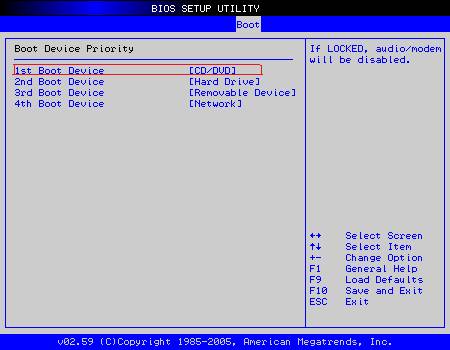
Your BIOS settings screen will most likely differ from the one shown in the figure, as it depends on the hardware of your specific computer.
- Use the left and right arrow keys on your keyboard to select Boo t.
- Then use the up and down arrow keys to select Boot device priority and press the key Enter. The section will open Boot device priority.
- In it, select the item 1st boot device and press the key Enter.
- A window will open Options. In it, select the drive into which you inserted the OS installation disk and press the key Enter.
- To exit to the main settings menu BIOS press the key Esc.
- Select an item Exit and press the key Enter.
- In the window that appears Save configuration changes and exit now? confirm saving the settings by selecting Ok.
The computer will restart and boot from the installation disc. If this does not happen now, then something is wrong with your installation disk. It should be replaced.
Selecting a disk partition
After you run Windows Setup, you will be prompted to select your system language and review the license agreement. Then you need to select the installation type. Choose Full installation to be able to configure additional settings. One of the first steps is to select a partition hard drive, on which the installation will be performed.


You can select the same partition on which the previous OS was installed. It is important to remember that for normal Windows operation 7 requires at least 20 GB of free space, and for comfortable work it is desirable to have 40 GB. Windows 8 requires at least the same 20 GB of disk space, but in reality, even 60 GB may not be enough for comfortable work. These facts should be kept in mind when choosing the partition on which you will install the OS.
Formatting a partition
In our case, the program does not allow you to install the OS on the same partition in which the current system is installed. And this is correct, because there is not enough free space here. Therefore, this section needs to be formatted. This will guarantee that there are no files left from the previous OS on the system disk and it will not affect the newly installed system in any way.
- Before you format the highlighted partition, make sure you select the partition you want. Then click on the link Disk setup.
- will appear additional settings, among which there will be an item Format. Click on it.
- A window will appear warning you about the possible loss of important data stored on the partition being formatted. Confirm your actions by pressing the button OK.
- After formatting is complete, select the formatted partition as the drive on which the OS will be installed and click the button Further.
The installation process will begin, which will not require your intervention until a certain stage.
Selecting a username
After completing the OS file setup operations, you will be prompted to enter your username and computer name. This is generally a simple procedure, but you need to take one nuance into account. There are known cases where some applications did not work correctly with Cyrillic usernames. More precisely, not even with names, but with paths to folders, to which the system itself assigns a name identical to the user name. Therefore, to avoid problems in the future, enter the username and computer name here in Latin letters.

This is all the more important because now you are actually creating an administrator account, which will subsequently affect the work of all other accounts (of course, provided that you are not using the computer alone and are creating accounts for other users).
Setting a strong password and other settings
In the next step, the installer will ask you to set a password for the user to log in to the system. If you are not the only computer user, be sure to indicate complex password, consisting not only of letters, but also of numbers and at least one special character. This will protect you from outside interference in the system.

For other users in the future, after installation is complete, create separate accounts with limited rights. This will allow you to properly restrict access to your computer and save you from the need to correct errors in the system that arose due to the fault of other users. Later in the installation process, you will be asked to select automatic update options. Select an item Use recommended settings. This will provide the most reliable protection for your computer. Then you should correctly specify your time zone and current date and time. The correct operation of many programs, including antivirus, depends on this.

Some time after the system has made the necessary settings, you will see a familiar and familiar Windows desktop. This completes the reinstallation of Windows 7.
14.01.2016
Before installing Windows 7 on a laptop, you need to make sure that all important data has been copied to a USB drive, another hard drive partition, or to another hard drive. Surely, on any computer there is information that can be useful in the future, so we save it to avoid loss.
If you bought a laptop with licensed Windows 7 and don’t want to lose your license, then instead of reinstalling, you can restore the system to factory settings. The manufacturer reserves the system's hard drive memory (on some models a separate logical drive can be used for this) of several gigabytes, which is where all the files needed to restore Windows are located.
Unlike reinstalling the OS, we will need to run not the Windows Installer, but the recovery utility. To launch it, you need to press the key shown in the computer startup window next to the manufacturer’s logo.
To run the recovery utility on some models Sony VAIO, for example, there is an ASSIST button.
ASSIST key on a Sony Vaio laptop
To launch the recovery utility, press the corresponding key on the laptop:
- Samsung - F4
- Lenovo-F11
- HP - F11
- LG-F11
- ACER – alt+F10
- ASUS – as soon as the splash screen appears, press F9
- DELL – as soon as the splash screen appears, press F9
- Sony Vaio – F10 (in rare cases you need to press the ASSIST button)
- Rover – when you turn on the laptop, you need to hold down ALT.
- Fujitsu - F8
To get more detailed information To run the recovery utility for your laptop, you can look in the instructions or on the manufacturer’s website.
Now, using an HP laptop as an example, I will show you how to restore the system to factory settings.
To launch the system recovery utility, after pressing the power button, press the Esc button several times. After this we see the following window.

To launch the recovery utility, press the F11 key.
We launch the recovery program and select the item “Restore the system to its original state when supplied from the manufacturer.”

If all important data is saved, then we continue recovery without creating backup copy files. Click Next.

We disconnect all connected devices from the laptop: flash drives, printers, modems.
Click “Next”.

Then the Windows recovery procedure starts. It will take approximately 15-20 minutes, this time is several times shorter than a complete reinstallation of the system. The progress of the operation can be seen on the display.

After the recovery is complete, click on the Finish button and reboot. Licensed Windows 7 with factory settings and all pre-installed programs is ready for use.

However, this logical partition on the disk on which the files necessary to restore Windows are stored can be easily deleted, for example, during installation pirated copy Windows "professionals" to increase hard drive memory by several gigabytes. If this is your case, then read on.
Installing Windows 7 from a USB flash drive
The main steps that need to be performed to install Windows 7 on a laptop are setting up the BIOS firmware and directly installing the operating system.
Then everything is even simpler. To reinstall Windows 7 on a laptop, simply follow the installation instructions, watching the installation process step by step. Below are screenshots with a short explanation of the actions performed.
If you want to keep your license
Now we are looking for this sticker on our laptop with the key and the name of the version of licensed Windows 7. If you had licensed Windows 7 installed when you bought your laptop, then you will definitely find this sticker.

Now download the OS distribution kit, the key of which is indicated on the sticker. If it says Windows 7 Home Premium, then you need to download the image of this particular version of the OS and install it. For other distributions license key will not work.
We continue installing Windows 7 on the laptop
The reinstallation process described below is suitable for any laptop or computer.
Now we will need to write down the downloaded Windows distribution 7 to a flash drive or disk and start installing the system through the BIOS. For Windows entries You can use one of the following programs:
- Ultra ISO
- WinSetupFromUSB
- Windows 7 USB/DVD Download Tool 1.0
- WinToFlash
You can read more about each of them, the advantages and methods of recording a disk image for each program in.
To run USB on your computer, you must first set the drive as a priority BIOS downloads to first place. To do this, go to the BIOS by pressing the appropriate key.
| PC Manufacturer | Keys |
| Acer | F1, F2, Ctrl+Alt+Esc |
| AST | Ctrl+Alt+Esc, Ctrl+Alt+Del |
| Compaq | F10 |
| CompUSA | Del |
| Cybermax | Esc |
| Dell 400 | F3, F1 |
| Dell Dimension | F2, Del |
| Dell Inspiron | F2 |
| Dell Latitude | Fn+F1 |
| Dell Latitude | F2 |
| Dell Optiplex | Del, F2 |
| Dell Precision | F2 |
| eMachine | Del |
| Gateway | F1, F2 |
| HP | F1, F2 |
| IBM | F1 |
| IBM E-pro Laptop | F2 |
| IBM PS/2 | Ctrl+Alt+Ins then Ctrl+Alt+Del |
| IBM Thinkpad | from Windows: Programs >Thinkpad CFG |
| Intel Tangent | Del |
| Micron | F1, F2, or Del |
| Packard Bell | F1, F2, Del |
| Sony VAIO | F2, F3 |
| Tiger | Del |
| Toshiba | ESC, F1 |
Depending on version BIOS setup Bootloader priorities may vary, but in general it comes down to several steps in all cases: entering the BIOS - Finding the option responsible for device boot priority - Setting boot priorities.
Go to BIOS

Login to download section

Setting download priorities

In our case, we select boot from USB or boot from CD-ROM if Windows needs to be installed from disk. Don't forget to save the changed parameters before exiting.
Read more about the Bios firmware, its types and settings.
If all the settings in the BIOS were made correctly, then a window like this will appear with the inscription “Press any key to boot from CD or DVD,” which means “Press any key to boot from a CD or DVD.”
 “Press any key to boot from CD or DVD” window, which means “Press any key to boot from CD or DVD”
Click “Install” to begin installing Windows.
 Click “Install” to continue installing Windows 7
 Here we need to select the version of Windows for which we have the key. You will need to enter it not now, but at the end of the installation. Also, if you do not enter the key at all, then within 30 days the installed OS can be used without any restrictions. The only thing that will appear is constant security messages about entering the key.

We agree to the terms license agreement. Click Next.

Select the full installation.

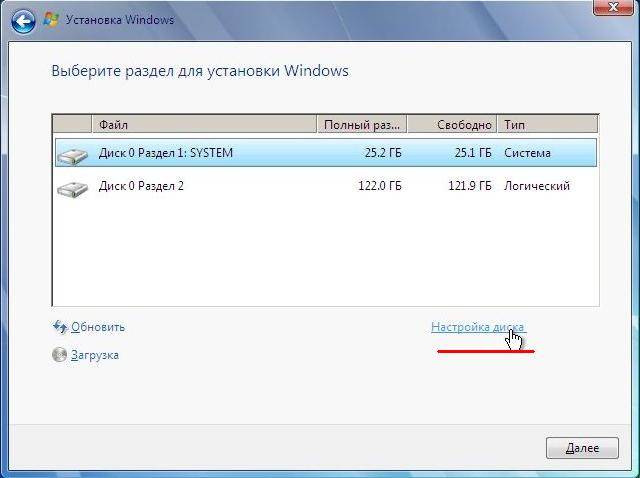
Select a partition to install Windows 7. To format the partition, click Disk Setup. If you do not have any created partitions, and the system defines the disk as an unallocated area, we also use the Disk Settings utility to create a new partition.

This is where there may be a section in which files for automatic recovery of the laptop are saved. This method automatic installation Windows was described a little higher.

The installer warns us that the disk will be completely cleaned and all files on the disk will be erased. If you have important data on your hard drive, be sure to copy it to another disk partition or to a flash drive. By clicking OK we agree.


We wait until the installation of the system is completed. Our participation is not required here, we are just waiting.

After installation, enter the computer user name.


Enter the key if required.

Set the security mode. Here you can just turn it on or off automatic update and firewall.
 Choose to turn off or leave automatic Windows updates enabled
If your computer has network connections and there is no need to install a driver, the system will prompt you to select the connection type.

This completes the Windows installation. To make your computer a full-fledged assistant, you can proceed to installing drivers and necessary programs.

That's all for me. The instructions turned out to be quite detailed and large. But this shouldn't scare you. It is designed primarily for beginners, for those who have not installed Windows 7 on a laptop before.
Many laptops are sold with a pre-installed version of Windows 8, which, as practice has shown, does not suit a large number of users. In addition, the OS Windows any version sooner or later becomes clogged and also requires reinstallation. Also, reinstallation is often caused by various problems, with computers, for example, if it does not turn on or if it is blocked. Despite the fairly large number of steps involved in reinstalling Windows, even the most inexperienced user can install the OS using these instructions.
Preparing for reinstallation
The first thing you need to do is select the disk partition to install Windows. As a rule, a hard disk partition of at least 50 GB is allocated.
If your computer already has an operating system, you should save everything Required documents to reinstall the OS without losing data.
To install the OS, you will need an 8 GB DVD or flash drive, on which a bootable installation will be created.
Selecting the OS version
The most common and stable version The OS from Microsoft is Windows 7, in some cases it can be reinstalled on Windows XP. The most decisive factor in choosing Windows is the availability of the necessary drivers. To check for which OS version your laptop has drivers, you need to go to the official website of the developer and look in the support section.
Most modern laptops have drivers only for Windows 88.1, some of them are also suitable for Windows 7, unfortunately, the correct operation of all devices cannot be guaranteed.
For correct operation, it is recommended to install exactly the system for which the manufacturer provided drivers. If your laptop has more than 4 GB random access memory
you should select the system bit size – 32(x86) or 64(x64). To use more than 4 GB of RAM, it is recommended to select Windowsx64. After selecting the Windows version, you need to download it. It is advisable to download an image as close as possible to the licensed version without adding additional software. Such Windows version
will be more stable and will not cause additional problems during installation of the operating system. The most common option is the Windows 7 Maximum license.
Video: How to install Windows 7
Creating a boot disk or flash drive You must upload the image to ISO format
, most of the options are provided in this extension due to the ease of use when creating a bootable flash drive or disk. To create you will need Windows program
7 USB/DVD Download Tool, which can also be downloaded from the Microsoft website.
- Install the program and proceed to the main steps:
- run the program;
- Click “Browse” and specify the location of the Windows installation image in ISO format. Clicks “Next”;
- in the next menu you need to select the type of media on which the Windows installation will be recorded - USB or DVD. If the drive does not work or is missing, then there is only one option left - a USB drive;
- Next, you should select the disk on which the recording will be made. After selection, you must click “Begin Copying”;
- For a flash device, the program will ask for confirmation of formatting, for which you need to click “Erase;
The program will display a corresponding message about successful recording.
After creating the disk or flash drive, you can reboot the computer. Do not forget that all data on the disk on which you will install Windows will be deleted. You should also take care of your Internet connection settings; you can contact your provider or record the data yourself.
To begin installation, you must restart your computer and set your device to boot from the Windows installation files.
Setting up BIOS for installation
When reinstalling the operating system from a flash drive, you must set the boot priority from a specific device, in this case, flash drives or DVD drive A. This operation is performed for installation on a computer both without an operating system and with it. Fortunately, most modern laptops have a feature to quickly select a device to boot from. To call this menu when booting the laptop, a specific key is used.
Using this table you can select a button for your device:

By clicking the button, the computer will present a window for selecting the device from which it will boot first. In our case, we choose a DVD drive or a USB drive.

There is a more complex installation option via BIOS on an empty laptop or with an installed OS. To do this, when starting the devices, go to the BIOS (the button is indicated in the table provided). BIOS from different manufacturers has some differences, so the location of the settings may differ from those shown.
In the BIOS, go to the “Boot” or “Advanced BIOS Features” section and set the parameter to First Boot Device your device is a USB drive or DVD drive. To save the settings, press F10 and select “Save and Exit”. Thus, installation is performed from Dos via a USB flash drive or via BIOS from a disk.
Reinstallation process
After completing all the settings in the BIOS, you can proceed to installing the OS. If all actions are performed correctly after booting, the system will display the message “Press any key to boot from...”. To continue, press any key and wait for it to load.
In this case, we will look at installing Windows 7; other versions have minor differences, but the principle of operation remains the same:

- in the first Windows installation menu, you must select a language, then click “Next”;
- in the next section, click the “Install” button;
- if the downloaded image includes several OS configurations, for example, “home basic” or “maximum”, then the installer will offer to choose one of the options;
- in the next menu you must confirm your agreement with all items.
Selecting the installation type
- the program has the ability Windows updates, in which all files will be saved in a separate folder. Despite this convenience, it is recommended to select the “Full installation” mode. This option provides installation of the most stable and “clean” operating system;

Formatting a partition
- After selecting the installation, the program will prompt you to select the disk partition in which Windows will be installed. In this menu, you can format or distribute space between your hard drive partitions by opening a set additional options"Disk Settings".
Unfortunately, these operations will delete all information from the disk. This function allows you to create disks of the required size, for example, if your laptop was purchased without its axis HDD not "broken". Don't forget to format all empty disks after performing operations on hard disk partitions. After completing all the steps, select the disk and click “Next”.
- after copying, the system will prompt you to enter the user name, computer name, and password;
- For security system settings to ensure computer protection, you should select “Recommended settings”;
- after selecting, set the time, date and select “ Home network» in the Internet connection menu.
Attention! When you restart your computer, you should remove the disk or flash drive to avoid reinstalling Windows.
At this stage, the Windows installation can be considered complete. Now you can install drivers, as well as various software and utilities. If you have changed the computer startup settings in the BIOS, we recommend that you set it to start from the hard drive first.
Reinstallation nuances if there is another OS
How to install Windows 7 on a laptop after Windows 8? Reinstalling an OS with Windows 8 does not make any difference if there is another OS from Microsoft on the hard drive. The only recommendation is to install the new operating system on the same partition in which the current OS is located.
Video: Why Windows won't install
How to reinstall Windows 7 with problems? If your Windows does not start, you will need to use another computer to create a disk or flash device. Since the installation is performed without starting Windows, problems with the previous OS will not interfere with the installation.
This article describes in detail the process of how to reinstall Windows 7 on a laptop without a disk by formatting your hard drive partition. Thanks to detailed description, even users with little experience will understand the principles of installing Windows 7 instead of 8. Reinstalling a new operating system allows you not only to get the desired OS version, but also to get rid of a large amount of software that is reinstalled by the laptop manufacturer.
>The need to reinstall Windows occurs every now and then among users of this operating system. The reasons may be different - crashes, viruses, accidental deletion system files, the desire to restore the purity of the OS and others. Reinstalling Windows 7, Windows 10 and 8 are technically performed in the same ways, with Windows XP the process is slightly different, but the essence remains the same.
More than a dozen instructions related to reinstalling the OS have been published on this site; in this article I will try to collect all the material that may be required to reinstall Windows, describe the main nuances, and tell you about the solution possible problems, and I’ll also tell you what it is necessary and advisable to do after reinstallation.
There are different ways to reinstall Windows 7 and Windows 10 and 8 on modern laptops and computers. Let's look at the most common options.
Using a recovery partition or disk; resetting a laptop or computer to factory settings
Almost all branded computers, all-in-one PCs and laptops sold today (Asus, HP, Samsung, Sony, Acer and others) have a hidden recovery partition on their hard drive, which contains all the pre-installed licensed Windows files, drivers and programs pre-installed by the manufacturer (by the way, this is why The hard drive capacity may appear significantly smaller than stated in the technical specifications PC). Some computer manufacturers, including Russian ones, include a CD for restoring the computer to its factory state, which is basically the same as a hidden recovery partition.

Reinstalling Windows using Acer Recovery Utility
As a rule, you can start system recovery and automatic reinstallation of Windows in this case using the appropriate proprietary utility or by pressing certain keys when turning on the computer. Information about these keys for each device model can be found on the Internet or in the instructions for it. If you have a manufacturer's CD, simply boot from it and follow the instructions of the recovery wizard.

On laptops and computers with pre-installed Windows 8 and 8.1 (as well as in Windows 10, as mentioned above), a reset to factory settings can be started using the operating system itself - for this, in the computer settings, in the “Update and Recovery” section there is an item “Removal all data and reinstall Windows." There is also a reset option with saving user data. If Windows startup 8 is impossible, then the option of using certain keys when turning on the computer is also suitable.
I wrote in more detail about using the recovery partition to reinstall Windows 10, 7 and 8 in relation to various brands of laptops in the instructions:
The same approach is used for desktop computers and all-in-one computers.

However, this option is not always applicable for the following reasons:
- When you buy a computer assembled by specialists from a small store, you are unlikely to find a recovery partition on it.
- Often, in order to save money, a computer or laptop is purchased without a pre-installed OS, and, accordingly, without the means for its automatic installation.
- Even more often, users themselves, or a wizard called, decide to install Windows 7 Ultimate instead of the pre-installed licensed Windows 7 Home, 8 or Windows 10, and at the installation stage they delete the recovery partition. A completely unjustified action in 95% of cases.
Thus, if you have the opportunity to simply reset your computer to factory settings, I recommend doing just that: Windows will be automatically reinstalled along with all the necessary drivers. At the end of the article I will also give information about what it is advisable to do after such a reinstallation.
Reinstalling Windows with formatting the hard drive
How to reinstall Windows with hard formatting disk or its system partition (drive C) is the next one that can be recommended. In some cases it is even more preferable than the method described above.

Essentially, in this case, reinstallation is a clean installation of the OS from the distribution kit on a USB flash drive or CD ( bootable flash drive or disk). In this case, all programs and user data from the system partition of the disk are deleted ( important files can be saved on other partitions or on an external drive), and after reinstallation you will also need to install all drivers for the equipment. When using this method, you can also partition the disk during the installation phase. Below is a list of instructions that will help you reinstall from start to finish:
- (including creating a bootable USB flash drive)
As I said, this method is preferable if the first one described does not suit you.
Reinstalling Windows 7, Windows 10 and 8 without formatting the HDD

Two Windows 7 in boot after reinstalling the OS without formatting
But this option is not very meaningful and is most often used by those who are reinstalling the operating system on their own for the first time without any instructions. In this case, the installation steps are similar to the previous case, but at the stage of selecting a hard drive partition for installation, the user does not format it, but simply clicks “Next”. What happens in the end:
- A Windows.old folder appears on your hard drive, containing files from the previous Windows installation, as well as user files and folders from the desktop, My Documents folders, and the like. Cm. .
- When you turn on the computer, a menu appears to select one of two Windows, and only the one that was just installed works. See.
- Your files and folders on the system partition (and on others too) of your hard drive remain untouched. This is both good and bad at the same time. The good thing is that the data was saved. It’s bad that there is a lot of “garbage” left on the hard drive from previous installed programs and the OS itself.
- You still need to install all the drivers and reinstall all the programs - they will not be saved.
Thus, when this method reinstallation you get almost the same result as with clean install Windows (except that your data is saved where it was), but you do not get rid of various unnecessary files accumulated in the previous copy of Windows.
What to do after reinstalling Windows
After Windows has been reinstalled, depending on the method used, I would recommend performing a number of priority actions, and after they are done, while the computer is still clean of programs, creating a system image and using it next time to reinstall: .
After using the recovery partition to reinstall:
- Remove unnecessary programs computer manufacturer - all kinds of McAfee, unused proprietary utilities in startup and so on.
- Update your drivers. Despite the fact that all drivers in this case are installed automatically, you should at least update the video card driver: this can have a positive effect on performance and not only in games.
When reinstalling Windows and formatting the hard drive:
- Install hardware drivers, preferably from the official website of the laptop or motherboard manufacturer.
When reinstalling without formatting:
- Get it necessary files(if any) from the Windows.old folder and delete this folder (link to instructions above).
- Delete second Windows from download.
- Install all necessary drivers for equipment.
This, apparently, is all that I managed to collect and logically connect on the topic of reinstalling Windows. In fact, there is more material on this topic on the site and you can find most of it on the page. Perhaps you can find something that I didn’t take into account there. Also, if you encounter any problems when reinstalling the OS, just enter the description of the problem in the search at the top left of my website; most likely, I have already described its solution.
In this article we will look in detail how to install Windows 7. But before you start installing Windows, you MUST make a backup of your important data, that is, save all your data to another partition, or to a flash drive, disk, etc.
All you need to install Windows 7 is boot disk with this operating system, as well as some free time and patience.
So, let's begin.
Installing Windows 7 in pictures
1. Insert the disk with Windows 7 OS into the DVD-Rom of your computer and, as soon as the computer starts to boot, go to the BIOS (to enter the BIOS, as a rule, you need to press the DEL key) to select boot from DVD disc. In the BIOS, go to the “Boot” -> “Boot Device Priority” menu and for the first item “1st Boot Device” set the value to “CDROM”, as in the figure below:
The second option to boot from a DVD disc is, as soon as you turn on the computer, press the F8 key to bring up the boot option selection menu and select boot from CD-ROM/DVD-ROM.
2. As soon as you select the disk with Windows 7 OS to boot, its installation will automatically start:

After a few seconds, you will see the following window:


In the next window you will be asked to select the option to install Windows 7:

I recommend installing a clean one - “Full installation”. With this installation, it is formatted system disk and correspondingly previous version Windows and all data, parameters and settings will be completely deleted, which will help avoid possible failures and errors, this is the most reliable way installations.
There are times when the operating system crashes for one reason or another, or a file is missing, or something else, in which case you can try update Windows, selecting the first item - “Update”. With this option, all program settings, drivers and all your data are saved. But, since everything is saved, then with the same “success” all program problems or other errors are saved, which can lead to malfunctions in the newly installed Windows. If the system starts, then the update is best launched from the Windows environment itself.

If the disk is new and not marked, then there will be a picture like mine above, but if, then all yours will be presented here sections of hard disk. When you select drive C, as a rule, be sure to format it; to do this, click on the “Disk Setup” link and an additional menu will appear:

The main work is done, the installer will do everything itself. The installation procedure will take about half an hour, during which time no intervention is required from you, so you can calmly step away from the computer and go about your business.
Now you have almost managed to install Windows 7, there is nothing left.
Once the installation is complete, you will need to create your account. Create a username for yourself and enter in the “Username” field:

You will then be asked to create a password for your account, a password is not required, and if no one else uses the computer except you or you do not have confidential information that needs to be stored in secret, then the password does not need to be specified.

In the next window you must enter serial number your copy:

Select Windows protection settings; in most cases, the first option is suitable - “Use recommended settings”:

Set the system time:

And the network option, for most users the “Public Network” option is suitable:

And after all these small settings, the desktop of the newly installed operating system will load in front of you:

That's all. As you can see, installing Windows 7 is not at all difficult, no more difficult than installing any other program. And it is available to absolutely any user.
Therefore, if you have doubts about your capabilities, discard them and start installing the operating system on your own and don’t be afraid of anything. And if you have any difficulties, ask in the comments.


