In previous articles on local security policies, you learned about how account policies and audit policies work. With the knowledge you have acquired, you can significantly secure your users' credentials and track unauthorized access attempts. It is worth considering that users do not have a sufficient security knowledge base, and even a regular user may have enough privileges to damage their system and even computers on your intranet. Local security policies for assigning user rights help to avoid such problems, which, in fact, will be discussed in this article. With the help of user rights assignment policies, you can determine which users or user groups will be granted different rights and privileges. With these policies, you don't have to worry about users doing things they shouldn't. 44 security policies are available for assigning rights, the application of which will be discussed later.
User Rights Assignment Policies
As mentioned above, there are 44 security policies for assigning user rights. Next, you will be able to familiarize yourself with eighteen security policies that are responsible for assigning various rights to users or groups in your organization.
- Archiving files and directories. With this policy, you can specify users or groups intended to perform operations Reserve copy files, directories, registry keys and other objects that are subject to archiving. This policy grants access to the following permissions:
- Browse Folders/Execute Files
- Folder Contents/Data Reading
- Reading Attributes
- Reading Extended Attributes
- Read permissions
"Administrators" and "Archive Operators", and on domain controllers - "Archive Operators" and "Server Operators".
On workstations and servers, these privileges are granted to groups "Administrators" and "Archive Operators", and on domain controllers - "Archive Operators" and "Server Operators".
By default, on both workstations and domain controllers, these privileges are granted to groups "Administrators" and "Archive Operators".
By default, on both workstations and servers, neither group has permission to do so.
By default, only administrators of workstations and domain controllers have such rights.
By default, all authenticated users on domain controllers can add up to ten computers.
By default, on both workstations and servers, neither group has permission to do so.
On workstations and servers, these privileges are granted to groups "Administrators" and "Archive Operators", "Users" and "Everything". On domain controllers - "Administrators", "Verified Users", "Enterprise Domain Controllers" and "Everything".
On workstations and servers, these privileges are granted to groups "Administrators", "Archive Operators" and "Users"(only on workstations), and on domain controllers - "Administrators", "Archive Operators", "Server Operators" and "Print Operators".
On workstations and servers, these privileges are granted to groups "Administrators", and on domain controllers - "Administrators" and "Print Operators".
By default, both on workstations and on domain controllers, these privileges are granted to accounts "Network Service" and "Local Service".
By default, on both workstations and servers, everyone is allowed to log in as a remote desktop client.
By default, all users are allowed to log in.
By default, no one is allowed to change object labels.
On workstations and domain controllers, by default these privileges are granted to groups "Administrators".
On workstations and servers, these privileges are granted to groups "Administrators" and "Local Service", and on domain controllers - "Administrators", "Server Operators" and "Local Service".
On workstations and domain controllers, by default, these privileges are granted to groups "Administrators" and "Users".
Apply policies assign user rights
In this example, I'll show you how you can assign rights to one of your organization's groups on a domain controller. Do the following:

Conclusion
In this article, we continued to study security policies, namely, we learned about the policies for assigning user rights. With the help of user rights assignment policies, you can determine which users or user groups will be granted different rights and privileges. 18 out of 44 security policies are described in detail. The example in the article also showed you how you can apply these policies in your organization. In the next article, you will learn about the policies that control event logs.
When creating a task in the windows scheduler and trying to run it, an error pops up. This task requires that the specified user account has rights to log on as a batch task. The fact is that the account on behalf of which I am trying to run does not have enough rights.
This security setting allows a user to log on using the batch processing tool.
For example, if a user initiates a job using the Task Scheduler, the Scheduler ensures that the user is logged on as a batch user, not as an interactive user.
Note
- In operating rooms Windows systems 2000 Server, Windows 2000 Professional, Windows XP Professional. and families Windows Server The 2003 Task Scheduler automatically grants this right as a requirement.
You can solve this problem either in local or in group policy by setting the desired parameter and giving the right user rights along the way Account on behalf of which the task is to be executed, in "Local Security Policy\Computer Configuration\Windows Settings\Security Settings\Local Policies\User Rights Assignment" the "Log on as a batch task" right must be selected (In the foreign language interface, it will be in "Local policy \Computer Configuration\Windows Settings\Security Settings\Local Policies\User Rights Assignment\" will highlight "Log on as a batch job").

By default, Administrators and Backup Operators have rights in this group, do not forget to add them here in the group policy, otherwise you will overwrite their rights.

2. Block the start of sessions
We launch the 1C:Enterprise server administration console, open the properties information base and set the checkbox for the property Session start blocking enabled. Please note that as soon as you apply this property, the start of any sessions will be blocked, therefore, in order to perform the next step, the configurator must be launched before applying the property.3. Making a backup
Here, as your soul tells you. In my opinion, the simplest and reliable way creation backup- this is an unloading of the infobase through the configurator.4. Set local security policies
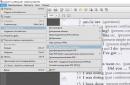
Open the "Local Security Policy" console (in command line type secpol.msc). Go to the section Local Policies -> User Rights Assignment and add the domain user to the policies (see Figure 1):- Login as a batch job(Log on as batch job) - ensures the functioning of the Task Scheduler without the need for the user to personally log into the computer under his account;
- Sign in as a service(Log on as service) - allows you to run on behalf of the user any process as a service.
- Accessing a computer from the network(Access this computer from the network) - the user has the right to connect to the computer from the network;
- Local logon y (Allow log on locally) - the user has the right to start an interactive session on the computer;
- Allow login through Remote Desktop Service(Allow log on through Remote Desktop Services) - the user has the right to log in remote computer through a Remote Desktop Services connection.
5. Add a domain user to groups
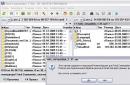
Open the "Computer Management" console, go to the section Utilities -> Local Users -> Users and look at which groups the local user belongs to, on behalf of which the 1C:Enterprise Server Agent service works (usually this is the user USR1CV8) (see Figure 2).We add the domain user to the same groups.
6. Run the agent on behalf of the domain user
Open the "Services" console, find the "Server Agent 1C: Enterprise" service in the list and open its properties. On the tab Are common stop the service, on the tab Login instead of local user specify the domain name (see Figure 3).Go back to the tab Are common and start the service. If everything is configured correctly, the service starts without problems.
You can say that the 2nd and 3rd points are redundant, but it is better to overdo it than to underdo it. The instruction is valid not only for a domain user, but also for a local one.