Very often, to install programs downloaded from torrents, you need to edit the system hosts file. With grief in half, the user finds it, opens it with a notepad or other text editor and makes the necessary changes. But then the most interesting thing begins - Windows 10 does not allow you to save hosts file after the change, citing the lack of permission from the user to save files to that location. Why is this happening?! The fact is that by default the account has ordinary user rights, which are not enough to change the system file. And how then to be? How to save the hosts file after modification ?! In fact, everything is quite easy and simple!
I know two ways to do this without activating the Administrator account and without using third-party programs.
I myself prefer the first option and I highly recommend it to you!
Method 1
1. First, in the taskbar, click on the search button. It is located next to Start.
2. Enter the word "notepad" in the search bar. The search results will appear, namely a link to the Notepad application. Right-click on it and select "Run as administrator" from the menu. This will launch an elevated text editor.
3. Open the hosts file via the "File >> Open" menu item:
Let me remind you that it is located in the directory:
4. Now you have full access to change the hosts file and you can add any entry there:
5. Save the file after modification via the menu item "File >> Save" or by pressing the key combination Ctrl + S. The save should go smoothly!
Method 2.
1. You, as usual, open the system folder in the explorer:
C: \ Windows \ system32 \ drivers \ etc
and just copy the file to your desktop.
2. Enter the necessary lines and save the hosts file after the change.
3. Copy the file and paste it back into the system folder:
Windows 10, of course, will start to swear that there is already a hosts file in the destination folder. In response to this, click on the "Replace" button.
4. The system will again swear that the user does not have enough rights and will offer to do everything with administrator rights:
This is what we need - click on the "Continue" button. The file will be successfully copied and will contain all the changes that you made. Profit!
Run the Command Prompt program on the system. To do this, go to the "Start" - "All Programs" - "Accessories". After that, left-click on the "Command Line" item. In the list of options that appears, select "Run as administrator". If required, enter the required password if you are using a Guest or Standard User account. You will see a black window in which you need to enter the command notepad C: \ Windows \ System32 \ drivers \ etc \ hosts. After correct entry, the "Notepad" editor window will appear in front of you, which will be opened with administrator rights required to change and edit the document.
Modify the file as per your requirement. To add an unwanted resource to visit, enter a line like "127.0.0.1 site_address", where 127.0.0.1 blocks access to the site from the current computer, and "site_address" is the Internet address of the resource you want to block access to.
Opening a file directly from an editor window
You can also open the hosts file without using command line... To do this, go to the "Start" - "My Computer" - " Local disk C: ". Select Windows - System32 from the list of directories. In the list of programs that appears, find a file named Notepad (notepad.exe). Right-click on the document and select "Run as administrator". If necessary, enter the password for the administrator account in the system and click "OK". The "Notepad" window will appear in front of you. Go to the "File" - "Open" menu.
Through the opened directory, go to the folder "Computer" - "Local drive C:" - Windows - System32 - drivers - etc. In the list of files, select hosts and start editing it. After making the necessary changes, click "File" - "Save". If you cannot find the hosts file in the specified folder, use the "All files" switch available in the lower right corner of the "Open" window immediately after the "File name" line.
You can also change the hosts file under account administrator through the "Explorer". Click "Start" - "My Computer" and then go to "Local Drive C:" - Windows - System32 - drivers - etc. If the file does not appear in the list, go to Tools - Folder Options. Select the View tab and then click Show Hidden Files. Click "OK" to apply the changes. After that, right-click on the hosts file and select the "Open with" menu.
The hosts file is a rather vulnerable part of the Windows operating system. This file becomes the number one target for almost all viruses and Trojans that manage to infect a computer.
The task of this file is to store a list of domains and their corresponding ip-addresses. The operating system uses this list to translate domains to ip addresses and vice versa.
Every time you enter the address you need for a site into the address bar of your browser, a request is made to convert the domain to an ip-address. This translation is now performed by a service called DNS. But, at the dawn of the development of the Internet, the hosts file was the only way to associate a symbolic name (domain) with a specific ip-address.
Even now, this file has a direct impact on the conversion of symbolic names. If you add an entry in the hosts file that will associate an ip-address with a domain, then such an entry will work fine. This is exactly what the developers of viruses, Trojans and other malicious programs use.
As for the file structure, the hosts file is a plain text file without an extension. That is, this file is not called hosts.txt, but simply hosts. To edit it, you can use the usual Notepad text editor.

The standard hosts file consists of several lines that begin with a "#" character. These lines are ignored by the operating system and are just comments.
Also in the standard hosts file there is an entry "127.0.0.1 localhost". This entry means that when you access the symbolic name localhost, you will be accessing your own computer.
Hosts file fraud
There are two classic ways to benefit from making changes to the hosts file. Firstly, it can be used to block access to sites and servers of anti-virus programs.
For example, after infecting a computer, the virus addsin the hosts file the following entry: "127.0.0.1 kaspersky.com". When you try to open the kaspersky.com website, the operating system will connect to the ip-address 127.0.0.1. Naturally, this is the wrong ip address. This leads to access to this site is completely blocked.As a result, the user of the infected computer cannot download the anti-virus or anti-virus database updates.
In addition, virus developers can use another technique. By adding entries to the hosts file, they can redirect users to a fake site.
For example, after infecting a computer, the virus adds the following entry to the hosts file: “90.80.70.60 vkontakte.ru”. Where "90.80.70.60" is the IP address of the attacker's server. As a result, when trying to go to a well-known site, the user ends up on a site that looks exactly the same, but is located on someone else's server. As a result of such actions, fraudsters can obtain usernames, passwords and other personal information of the user.
So in case of any suspicion of a virus infection or site spoofing, the first thing to do is to check the HOSTS file.
The malware masks the modification of the hosts file as follows:
To make it harder to detect lines added by a virus, they are written to the end of the file.
After a long empty area formed as a result of multiple newlines;
After that, the Hidden attribute is assigned to the original hosts file (by default, hidden files and folders are not visible);
A false hosts file is created, which, unlike the real hosts file (which does not have an extension), has the extension .txt (by default, extensions are not displayed for registered file types):

Where is the hosts file
Depending on the version of the operating system Windows file hosts can be located in different folders. For example, if you use Windows XP, Windows Vista, Windows 7 or Windows 8, the file is located in the folderWINDOWS \ system32 \ drivers \ etc \

In Windows NT and Windows 2000 operating systems, this file is located in the folder WINNT \ system32 \ drivers \ etc \
Editing the hosts file
You can edit the file hosts and in Notepad, delete unnecessary lines, or add your own.
In order to edit the hosts file, you need to launch notepad in Administrator mode, and then open the file C: \ Windows \ System32 \ drivers \ etc \ hosts in it.
How to clean the hosts file
So, point by point.
Push "Start".

We choose "All programs".
Then we select the item "Standard".
On the "Notepad" item, click right click the mouse and select the item "Run as administrator".
In the notepad window that opens, select the File menu, then the item "Open..."
In the window that opens, select "Computer" on the left side of the window. 
Then open the disc WITH:.
Windows directory. 
System32 directory. 
The drivers directory. 
Directory etc. 
When you open the etc directory, you will have an empty directory. In the lower right corner of the window, select "All files".
Select the hosts file and click the button "Open".
Check that you have the required content: first there are explanatory comments from Microsoft about what the file is and how to use it. Then there are some examples of how to enter the various commands. All this is a simple text and it does not carry any functions! We skip it and reach the end. Then the commands themselves should go. Unlike comments (i.e. plain text), they must begin with not with a "#", but with specific digits representing the ip address.
Any commands that appear in your hosts file after the following lines can be malicious:
- On Windows XP: 127.0.0.1 localhost
- On Windows Vista: :: 1 localhost
- On Windows 7/8: # :: 1 localhost
As you can see, the host files differ slightly on different operating systems.
In order not to clean anything superfluous, you need to know how commands are decrypted. There is nothing complicated here. At the beginning of each command comes digital ip address, then (separated by a space) the corresponding letter Domain name , and after it there may be a small a comment after the "#" sign.
Remember!
All commands starting with with digits 127.0.0.1(with the exception of, 127.0.0.1 localhos t) block access to various sites and internet services. For which ones, see the next column after these numbers.
Commands having at the beginning any other numbers ip-addresses, redirect(redirect) to fraudulent sites instead of official ones. What sites have you changed to fraudulent, also look in each column following these numbers.
This way, it shouldn't be difficult to guess which commands in your host file are malicious! If, nevertheless, something is not clear - look at the screenshot below.

Consider another such moment. Many viral commands by cunning Internet intruders can be hidden far at the very bottom of the file, so don't be too lazy to scroll down to the bottom of the slider!

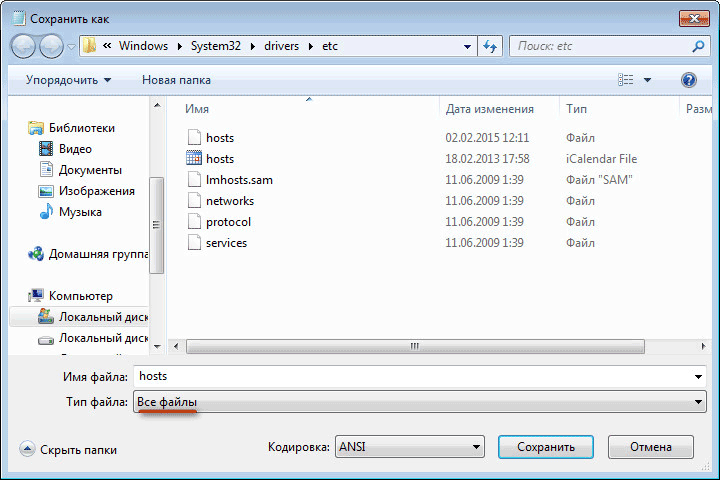
After you have done the "cleanup", do not forget to save all changes ( "File" --> "Save"). If you opened the hosts file from the Notepad program itself, while saving the changes, in the column "File type" be sure to choose an option "All files", otherwise notepad will only do it instead of saving it in the hosts file a text copy of hosts.txt, which is not a system file and does not perform any functions!

After successfully saving, do not forget to restart your computer.
How to block sites in hosts
So, the hosts file is already open and you can see that it is built in the form of an ordinary text document.
At the beginning, you will see comments (ordinary text that does not carry any functionality) starting with the symbol "#" ... They may be followed by some functional commands prescribed by the system.
But we don't need them. We skip them and reach the very end of the document. We indent. And now, here, you can already register the commands we need!

When you are finished with the file, open the File menu, select "Save".
To understand how to correctly enter commands for blocking web resources, you need to know that each PC has its own so-called. loopback address that sends any request back to itself. For any computers running Windows, Linux or Mac systems, this address is always the same - 127.0.0.1 ... Here, with the help of just this ip-address, you can block any request to an unwanted site so that it is directed not to the requested resource, but about back to the local computer.
This command in hosts is written as follows: " 127.0.0.1 name of the blocked domain ". Here are real examples: 127.0.0.1 mega-porno.ru, 127.0.0.1 odnoklassniki.ru, 127.0.0.1 vk.com etc.

That's all. Access to all unwanted sites is now securely blocked. The main thing, after the changes made, is to re-save the hosts file! Detailed instructions see above.
Recovering the hosts file after a virus infection
As already mentioned, today a large number of malicious programs use the file hosts to block access to websites of popular portals or social networks. Often, instead of blocking sites, malware redirects the user to pages that look similar to popular resources (social networks, email services, etc.), where an inattentive user enters credentials, thus getting to the attackers.
If the file contains records like 127.0.0.1 odnoklassniki.ru 127.0.0.1 vkontakte.ru or the addresses of your sites that you cannot access, then first check your computer for "malware", and then restore the file hosts
Many hacked users are interested in where you can download the hosts file. However, there is no need to search and download the original hosts file. You can fix it yourself, for this you need to open it with a text editor and delete everything except the line except "127.0.0.1 localhost". This will unblock access to all sites and update your antivirus.
Let's take a closer look at the process of restoring the hosts file:
1. Open the folder where the file is located. In order not to wander through the directories for a long time in search of the desired folder, you can use a little trick. Press the key combination Windows + R to open the menu "Run"... In the window that opens, enter the command "% Systemroot% \ system32 \ drivers \ etc"and click OK.
2. After that, a folder will open in front of you in which the hosts file is located.
3. Next, you need to do backup the current file. In case something goes wrong. If the hosts file exists, then simply rename it hosts.old. If the hosts file does not exist at all in this folder, then this item can be skipped.
4.Create a new empty hosts file. To do this, right-click in the etc folder and select the item"Create text document"
5. When the file is created, it must be renamed to hosts. When renaming, a window will appear in which there will be a warning that the file will be saved without the extension. Close the warning window by clicking OK.
6. After the new hosts file is created, you can edit it. To do this, open the file using Notepad.
7. Depending on the version of the operating system, the contents of the standard hosts file may differ.
This is how all, without exception, "clean" hosts files should look like. 


Note!
- For Windows XP and Windows Server 2003 needs to be added "127.0.0.1 localhost"
- Windows Vista, Windows Server 2008, Windows 7 and Windows 8 need to add two lines: "127.0.0.1 localhost" and ":: 1 localhost"
If you ever find missing or, on the contrary, unnecessary records in such a file, then it is better to delete them as soon as possible. Moreover, if they were not made by you or without your consent. Most likely, this is the result of viruses!
Restoring the default hosts file in Windows 7: Copy the text below to the file.
# Copyright (c) 1993-2009 Microsoft Corp.
#
# This is a sample HOSTS file used by Microsoft TCP / IP for Windows.
#
# This file contains the mappings of IP addresses to host names. Each
# entry should be kept on an individual line. The IP address should
# be placed in the first column followed by the corresponding host name.
# The IP address and the host name should be separated by at least one
# space.
#
# Additionally, comments (such as these) may be inserted on individual
# lines or following the machine name denoted by a "#" symbol.
#
# For example:
#
# 102.54.94.97 rhino.acme.com # source server
# 38.25.63.10 x.acme.com # x client host # localhost name resolution is handled within DNS itself.
# 127.0.0.1 localhost
# :: 1 localhost
Save and close the file.
The hosts file is designed to match domain names (sites), which are written using characters, and the corresponding IP addresses (for example, 145.45.32.65), which are written as four numbers. You can open any site in the browser not only after entering its name, but also after entering the IP address of this site.
On Windows, requesting the hosts file takes precedence over requesting DNS servers. At the same time, the contents of this file are controlled by the computer administrator himself.
Therefore, quite often malware tries to modify the contents of the host file. Why are they doing this?
They do this to block access to popular sites, or to redirect the user to other sites. There, at best, he will be shown advertising, and at worst, a fake page of a popular resource will be opened (social network, service window Email, online banking service, etc.), with a request to enter data from your account to enter the fake site.
Thus, due to the user's carelessness, an attacker can gain access to the user's data and harm him.
Where is the hosts file located?
The hosts file is located in the folder with the Windows operating system, usually this is the "C" drive on the user's computer.
The path to the hosts file will be like this:
C: \ Windows \ System32 \ drivers \ etc \ hosts
You can manually go through this path, or immediately open the folder with the host file using a special command.
For quick access to the file, press the "Windows" + "R" key combination on the keyboard. This will open the Run window. In the "Open" field, enter either the path to the file (see above), or one of these commands:
% systemroot% \ system32 \ drivers \ etc% WinDir% \ System32 \ Drivers \ Etc

This file has no extension, but it can be opened and edited in any text editor.
The standard contents of the hosts file
In the operating room Windows system, the "hosts" file has the following standard content:
# Copyright (c) 1993-2009 Microsoft Corp. # # This is a sample HOSTS file used by Microsoft TCP / IP for Windows. # # This file contains the mappings of IP addresses to host names. Each # entry should be kept on an individual line. The IP address should # be placed in the first column followed by the corresponding host name. # The IP address and the host name should be separated by at least one # space. # # Additionally, comments (such as these) may be inserted on individual # lines or following the machine name denoted by a "#" symbol. # # For example: # # 102.54.94.97 rhino.acme.com # source server # 38.25.63.10 x.acme.com # x client host # localhost name resolution is handled within DNS itself. # 127.0.0.1 localhost # :: 1 localhost
This file is similar in content to the operating systems Windows 7, Windows 8, Windows 10.
All entries that start with a hash # character and continue to the end of the line are largely irrelevant to Windows, as they are comments. These comments explain what this file is for.
It says here that the hosts file is for mapping IP addresses to site names. Entries in the hosts file will need to be made according to certain rules: each entry must begin with new line, the IP address is written first, and then the site name after at least one space. Further, after the hash (#), you can write a comment on the entry inserted into the file.
These comments do not affect the operation of the computer in any way, you can even delete all these entries, leaving only an empty file.
You can download the standard hosts file from here for installation on your computer. It can be used to replace a modified file if you do not want to edit the host file yourself on your computer.
What you should pay attention to
If this file on your computer is no different from this standard file, then this means that there are no problems that could arise due to modification of this file by malicious programs on your computer.
Pay special attention to the contents of the file after these lines:
# 127.0.0.1 localhost # :: 1 localhost
Additional records can be inserted into the host file, which are added here by some programs.
For example, in this image, you can see that the program has added some entries to the standard contents of the hosts file. Additional records were inserted between the commented lines to perform specific actions. This was done so that during the installation of programs on my computer, this utility rejects unwanted software.
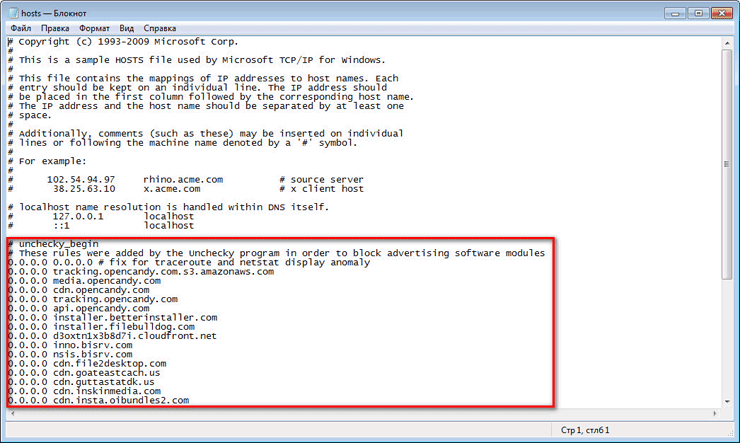
There may be additional lines of this type: first "a set of numbers", and then after a space, "site name", added in order, for example, to disable advertising in Skype, or to block access to a site.
If you yourself did not add anything to the hosts file, and do not use the program (Unchecky) mentioned in this article, then you can safely remove incomprehensible entries from the host file.
Why change the hosts file
The hosts file is modified in order to block access to a specific resource on the Internet, or in order to redirect the user to another site.
Usually, the initially malicious code is executed after launching a program downloaded from the Internet. At this point, changes are automatically made to the properties of the browser shortcut, and quite often additional lines are added to the hosts file.
To block a site (for example, a VKontakte site), lines of the following type are entered:
127.0.0.1 vk.com
For some sites, two variants of the site name may be entered with "www" or without this abbreviation.
You yourself can block unwanted sites on your computer by adding a similar entry to the host file:
127.0.0.1 site_name
In this entry, the IP address (127.0.0.1) is the address on your computer's network. Next is the name of the site that you need to block (for example, pikabu.ru).
As a result, after entering the name of the site, you will see a blank page from your computer, although the name of this web page will be written in the address bar of the browser. This site will be blocked on your computer.
When using a redirect, after entering the name of the desired site, a completely different site will be opened in the user's browser, usually a web page with an advertisement, or a fake page of a popular resource.
To redirect to another site, records of the following type are added to the host file:
157.15.215.69 site_name
First, there is a set of numbers - the IP address (I wrote random numbers here for an example), and then, after a space, the name of the site will be written in Latin letters, for example, vk.com or ok.ru.
The scheme of operation of this method is approximately the following: bad people specially create a fake (fake) site with a dedicated IP address (otherwise this method will not work). Next, an infected application enters the user's computer, after which the changes are made in the hosts file.
As a result, when a user types the name of a popular site in the address bar of the browser, then instead of the desired site, they transfer it to a completely different site. This could be a fake page. social network, which is designed to steal the user's personal data, or a site with intrusive advertising. Very often, from such a fake site, there are redirects (redirects) to many other specially created pages with ads.
How to edit the hosts file
You can change the content of the host file yourself by editing it with a text editor. One of the most simple ways, to be able to change the file, open the hosts file in Notepad by opening the program as administrator.
To do this, create a shortcut to the Notepad utility on the Desktop, or run the application in standard programs that are on the Start menu. To start, first click on the program shortcut with the right mouse button, and then select in context menu the item "Run as administrator". This will open the Notepad text editor window.
C: \ Windows \ System32 \ drivers \ etc
After opening the "etc" folder, you will not see the "hosts" file, since the display of text files will be selected in Explorer. Select the All Files preference. After that, the hosts file will be displayed in this folder. Now you can open the hosts file in Notepad to edit it.
After completing editing, changes in the hosts file. Please note that the file type when saving must be like this: "All files".
Conclusions of the article
In the event that a malicious program has changed entries in the hosts file, you can replace the modified file with a standard one, or edit the contents of this file by removing unnecessary entries from there.
How to change the hosts file (video)
Depending on the settings of the computer, sometimes if necessary make changes to system file hosts it turns out to be done, and in some cases it is not. More precisely, changes are made without problems, but it is no longer possible to save the file with them. It comes from doing it necessary with administrator rights... We'll figure it out now how to save changes to hosts Windows 10, 8 and 7 by opening this file with administrator rights.
- Launch the search bar (magnifying glass icon).
- Enter the query “ Notebook».
- On the found Notepad application, click the RIGHT mouse button and select "Run as administrator".
- In the opened Notepad, select the "File" menu.
- We click the item "Open ...".

- Insert the path into the explorer line: C: \ Windows \ System32 \ drivers \ etc
- Instead of the file type "Text documents (* .txt)" select "All files".
- Double click on the hosts file.

Now you can make all the necessary changes to this file and save them without any problems by selecting the menu "File" - " Save».
What is the hosts file for in the Windows 10 operating system
The hosts file is designed to assign specific IP addresses to specific sites. Most often it is used to block computer login to some Internet resources. For example, the entry 127.0.0.1 test.ru added to the bottom will block access to the test.ru site. Changes to hosts can be made both by some malicious programs and by the user himself, who needs to restrict access to a certain resource. global web- for example, to sites where the activation of an illegally installed program is checked.