Wi-Fi socket is a very convenient device. It's easy to install: just plug it in, install the mobile app and link them together. And easy to use: with one click you can turn it on or off. But before you buy this outlet, you should pay attention to two points.
It won't work if the internet goes down.
Wi-Fi socket is entirely dependent on Wi-Fi. If the Internet in your home suddenly disappears, the outlet will stop working. You will not be able to control it from your smartphone, it will not be able to work according to the appointed schedule.
An alternative is a smart socket that works through a Z-Wave or ZigBee controller. The bottom line here is that the conditions for turning on and off the outlet are not stored on cloud servers that require Wi-Fi to communicate with, but on the controller - the control device in your home.
If the Internet goes down, the ability to control the Z-Wave / ZigBee socket from the smartphone will also disappear. But she will still be able to work on schedule. In addition, such sockets can be configured to automatically turn on and off when sensors are triggered, temperature or humidity changes, and so on.
She will not interact with the smart light
The Wi-Fi socket is controlled directly through a standalone application, only an Internet router is needed to communicate between them. The downside is that smart devices from other manufacturers cannot be connected to this system. And in some cases, you can not connect anything at all except certain outlets.
This significantly limits the ability to control household appliances from a smartphone and home automation. Some manufacturers that offer several different devices(for example, smart sockets and kettles) make it possible to control these different devices from one application, but it will not work to go beyond these limits. You will not be able to immediately turn off sockets and lights or set a shutdown washing machine at a leak.
Really wide opportunities provides cross-platform automation when you can combine different devices from different manufacturers into a single network: motion or light sensors, smart switches and locks, automatic thermostats, and so on.
A controller is used to control such a system. On the one hand, installing a controller - another intermediary device (along with an Internet router) along with it - requires additional money and time. On the other hand, it is he who allows you to connect many different devices, set up their automatic interaction and ensure work regardless of the Internet connection.
In addition, a modern controller usually supports several different communication standards, and in addition to Z-Wave or ZigBee devices, you can connect the same Wi-Fi sockets to it, if you have already bought them.
Manage home comfort regardless of distances
Remote turning on and off household appliances using a smartphone
With an internet connection on your smartphone, you can control your home appliances from anywhere, no matter where you are. And in combination with a Xiaomi router, you have the opportunity to set certain scenarios for using a smart outlet. For example, before leaving work, you can remotely start the multicooker using your smartphone, turn on the light in the hallway, air purifier or water heater, so that when you return home after a hard day's work, you can immediately plunge into the atmosphere of warmth and comfort.

Safety first
Mobile monitoring of the status of connected equipment
Remote on/off
You no longer have to worry about unplugged electrical appliances when leaving the house. With the "Xiaomi Smart Home" app, you can check the status of the connected appliance and manage its power supply at any time. This will not only reduce energy consumption and ensure safety, but also increase the level of comfort in your life.

Scientific Approach to Energy Consumption
Schedule your home appliances
The timer function not only reduces energy consumption, which has a positive effect on the environment, but also makes the use of household appliances even more convenient, while extending their service life. For example, you can set a timer for the heater that will automatically turn off after you leave for work and turn on half an hour before you return home, ensuring a comfortable temperature when you are at home.

Compact size for simultaneous use
several sockets at once
Thanks to an optimized design and improved organization of the internal components of the socket, its size allows you to simultaneously connect several smart sockets to the surge protector at once, which makes it possible to remotely control even more household appliances.

Sophisticated manufacturing technologies
The body of the socket is made of flame retardant material, capable of withstanding temperatures up to 750°C, and manufactured using wave soldering technology. The build quality of the Xiaomi smart plug is approved by the national CQC quality standard. The socket has a built-in temperature sensor that monitors the operation of high-power devices and controls the internal temperature of the socket, and sends a notification to the user when the temperature rises significantly. When overheating, the outlet will automatically cut off the power supply to prevent fire and damage.

Three easy steps to use
With the help of the "Xiaomi Smart Home" mobile application, you can control the Xiaomi smart plug easily and simply

There are many models of Wi-Fi sockets on the market, which are characterized by one main feature - remote control from a smartphone. In addition, the socket may contain various sensors, which allow it to be both part of the security system and an independent "smart thing". In the context of the article, we will consider what a Wi-Fi socket with a temperature sensor is.
Peculiarities
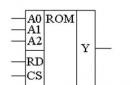
A Wi-Fi socket consists of a box, inside of which is the adapter socket itself and the board connected to it. The board contains the elements for operation, a temperature sensor and a wireless network adapter.
With the help of a Wi-Fi module operating in a home network, you can remotely turn on and off the power in the outlet, thereby controlling connected devices. The activation and deactivation function can be set by timing.
The temperature sensor connects a new parameter. With it, you can measure the ambient temperature and, for example, turn off the heater if the temperature is out of range. Or turn it on if the room gets cold. That is, the outlet works like a thermostat.
Network connection
Brief description and configuration of a smart socket with a thermostatSMART-T-Wi-Fi see the following video:
There are usually two options for connecting smart devices to a Wi-Fi network: pairing via WPS and setting up via a smartphone. The second method is more often used in smart sockets.
Consider the connection on a specific example. The SimPal-W230 model with a temperature sensor is connected as follows:
- Connect your smartphone to home wifi network where SimPal-W230 will work.
- Install the SimPal Wi-Fi Plug application on your smartphone.
- Open it and register an account.
- Power on the SimPal-W230 and wait for five beeps, which indicate an error connecting to the Wi-Fi network.
- In the application, click on the "+" in the upper right corner and go to "Set Wi-Fi on device".

- The SSID will already be indicated in the field, enter only the password and click "Connect".

- Successful connection to the home network will be notified by a long beep from the socket.
Registration in the application
After connecting the device to home network, you need to bind it in the application:
- Open the Add Device page.
- Enter the name and Mac address of the device, click add.

- After that, the device will be displayed on your phone and you can manage it.
The Mac address can be found on the back of the device, on the box, or in the booklet that comes with the SimPal-W230.
Control
After registering in the main menu, you will have a device and some data about it:
- Air temperature.
- Status.

By clicking on the device, you can go to the settings list:
- Power management.
- Temperature settings.
- Schedule.
- Alarm settings.

Nutrition
Functions available:
- Power on and off.
- Delay 1-3600 seconds to turn on. Set the time after which the device is activated.
- Delay 1-3600 seconds to turn off. Set the time after which the Wi-Fi socket with the temperature sensor is deactivated.
- Associated control sensors. If using additional sensors that are paired with the device, it can be configured to trigger a 30 second shutdown delay.
- Linked remote control. This feature allows the user to remotely control the power and the power on delay feature.
Temperature
You can set the thermostat function and select the mode in which it will work:
- Warning mode (heating) - when the maximum t mark (Higher temp) is crossed, the power is turned off. If t falls below Lower temp, the thermostat activates and supplies power.
- Cooling mode (cooling) - reverse Warning mode. Below Lower temp - power deactivation. Above Higher temp - turning on the device in the network.
- Temperature alarm - the range beyond which, if the temperature exceeds, a push notification will be sent to the smartphone.

A mechanical thermostat is usually not installed in a Wi-Fi outlet. It is possible to regulate only in this format. Although there are exceptions.
Schedule
There are two options available in this section: alarm and scheduled siren. You can set the time intervals for the start and end of the action.
Anxiety
Here you can set alarm parameters from sensors installed or paired with a Wi-Fi socket:
- Alarm - if the parameter is enabled, the wireless siren will turn on when the sensor is triggered.
- Siren Alarm - when the alarm mode is activated, the siren is activated. Disabling the alarm will deactivate the siren.
- Beeper Alarm - if the function is activated, a 10 second sound is emitted from the speaker of the socket.
- Alarm sensor - supports up to 10 sensors. Enter the name of the desired sensor and click Pair to pair. To complete the pairing, activate the sensor.
Restoring factory settings
If you need to reset all the settings that are in the memory of a smart Wi-Fi socket, press and hold the button on the case for 10 seconds. The reset is confirmed by a long beep.
Conclusion
In the home, a Wi-Fi socket with thermostatic capabilities and adjustable schedule settings is an extremely useful product that allows you to remotely control any appliance plugged into it. Setting up such devices is not difficult if you follow the instructions.
Hello dear readers. Today I got a rather interesting device for review, namely, a smart Wi-Fi socket HS-100 from the largest manufacturer network equipment TP-LINK. There are only two such devices in the manufacturer's assortment so far - the HS-100 model and the HS-110 model. The second model differs only in the added monitoring of energy consumption, otherwise the functionality is the same. The average retail price, at the time of writing, is about 2,500 rubles.
As an introduction, a few words about the very concept of "smart home", which has recently been gaining more and more popularity, including in our country. What is it, you ask? In a nutshell - home automation, using modern technologies. In Western terminology, two separate concepts are usually distinguished - home automation (smart home, home automation) and residential building automation (smart house, building automation), due to the difference in the scale of automation of an individual apartment and the entire building. Smart sockets belong to the first direction - home automation. Functionally, devices of this type are able to remotely turn on / off devices connected to them, including without human intervention - according to a schedule. I will try to describe in detail how this is implemented in the TP-Link HS100 model in this review.
Characteristics.
Protocol - IEEE 802.11b/g/n Type wireless transmission- 2.4GHz, 1T1R System Requirements - Android 4.1 or higher, iOS 8 or higher
General characteristics:
Certification - RoHS, EAC, CE Environment - working temperature: 0 ºC ~ 40 ºC, operating humidity: 5%~90%, non-condensing Dimensions (H x W x D) - 100.3 x 66.3 x 77 mm Material - polycarbonate Buttons - power button, settings button Weight - 131.8 g Package size - 90 x 88 x 144 mm
Working condition:
Input voltage - 100 - 240 VAC Output voltage- 100 - 240 V AC Maximum load - 16 A Maximum power - 3.68 kW
Packing and equipment.
The device comes in a small white cardboard box. The box itself is covered with a film, which additionally serves as a guarantee of receiving a new product in the store. On the front side there is a photo of the device itself, the name and logo of the manufacturer.

On the right side, a side view of the device, equipment, electrical specification, barcode and model number. There is also a QR code, the link leads to the product page on the manufacturer's website (in English).

On the left side is a description of the product features, again on English language.

On the back of the box system requirements for a mobile application and its key features, as well as manufacturer data and place of production. All information in English.

Above, only the manufacturer's logo and a euro hanger. Below is a sticker with a barcode, serial numbers. And data about the manufacturer, this time in Russian :-).

The box "matryoshka", to get to the contents, you need to pull the bottom.

Above is the documentation, under it is the socket itself in a hard plastic form.

Documentation includes a warranty card, two manuals for quick setup(Russian language only in one of them), a book with contacts of the support service (including for Russia), the text of the GPL license (only in English).

In general, there are no complaints about the packaging, the device is quite reliably protected from external factors. Only the low Russification of packaging and documentation is somewhat disappointing, only the bare minimum has been translated.
Appearance.
The body of the socket is oval, made of white polycarbonate. It consists of two halves - the front part with a socket and the back part with a plug. The front plane is glossy and initially covered with a transport film, in other parts it is matte plastic. The maximum dimensions are 100.3 x 66.3 x 77 (58 mm excluding fork length) mm. Front panel dimensions 55 x 80 mm. Schuko-type socket and plug, with a pair of grounding pins in the form of brackets. In our country, they are usually called erroneously "euro". On the back there is a sticker with the model, electrical data, serial number, MAC address.


There are only two buttons on the case. On the front is an on / off button with an LED indicator of operating modes. And on top of the settings button - for pairing with the application / reset to factory settings.

Build quality really high level, everything is well adjusted, no cracks, backlashes and squeaks are observed. True, and the possibility of parsing the device is not provided, which can upset someone. But you can’t blame the manufacturer for this either, this is his guarantee against “playful” pens.
At work.
To begin with, the general principle of operation of the device, the scheme is taken from the manufacturer's website.

The smart socket, thanks to the built-in Wi-Fi module, connects through a home router to the TP-LINK Cloud cloud service. The Kasa mobile app also connects to the cloud, allowing you to control your device remotely from anywhere in the world.
The setup process itself consists of three simple steps:
1) Install the Kasa mobile app on your smartphone(Android 4.1 or higher, iOS 8 or higher).2) Create account TP-LINK Cloud. 3) Step by step follow the process of connecting a smart plug to a home Wi-Fi network in the application.
So, for starters, install the Kasa for Mobile application on your smartphone. At the first start, we are asked to enter an existing account, or create a new one.

Choose create new account. To the specified during registration mailbox a confirmation email arrives. We follow the link in the letter and click continue in the Kasa application.


The device type selection window appears. Choose SMART PLUG.

We turn on the socket in the mains, the indicator on it lights up with yellow light, then. After 15 seconds, the indicator starts flashing amber/green, further. Within a few seconds there is automatic search, after which a window for naming the found device appears.

At this point, your smartphone will be connected directly to the outlet as an access point. At the same time, on iOS devices, you will need to manually find the access point and connect to it, and then return to the mobile application.

After entering the device name, you can select an icon - 21 options from the standard ones, or put your own from the album / camera.


This completes the device connection.

opens Homepage applications with a list of devices.

The settings of the application itself are minimal, in fact, apart from the item for checking the firmware update for the device, there is nothing useful there.

The main page of the connected device looks like this:

There is an on / off button, an operating time counter for the current day, a line of upcoming events and a choice of modes - Schedule, Away and Timer.
In the upper right corner, the settings button of the connected device. In them, you can enable / disable remote control, change the name and icon, change the time zone, view information about the device.

Now I'll tell you more about the modes.
First mode Schedule or scheduled work. We go to the corresponding icon, click on the plus sign to add an event. We select the time and action - turn it on or off, there is a repeat mode on certain days. At the end, click save, and the event appears in the list.

The next mode of operation is Away Mode or "away from home" mode. In this mode, the device turns on/off randomly, creating the appearance of presence. Here the time interval is set - the beginning and end, the repeat mode by day is also present.

And the last one is the mode timer– turning the device on or off after a specified period of time from the current one.

Another small remark on the regime remote access- if desired, it can be disabled in the settings, in which case the control will be open only for devices in the home Wi-Fi network, access from the Internet is blocked.

As you can see, everything is quite simple and intuitive.
A little help on the indication of work:
Flashing yellow and green- App setting mode. Fast flashing green- network connection. Lit green- connected to the network. Fast flashing yellow- reset to factory settings. Lights up yellow– reboot (download). Lights up red- no network connection.
It also shows that power is being supplied to the socket output - the power icon is green or off. Moreover, the button is mechanical, if desired, you can turn on the voltage supply manually.

Well, according to the functionality of the settings button:
- holding for 5 seconds puts the device into the setup mode using the application - holding for 10 seconds will reset the device to factory settings
As for the operation of the application, there are no complaints about stability, there are no freezes in the work. An example of work can be seen at the link below.
From the side of the device, everything also works like clockwork - the socket was installed at a distance of about 10 meters from the router, through one concrete wall, on the refrigerator behind the microwave. At the same time, no disconnections were observed.
The only thing that was noticed is that with a 3G connection, sometimes it doesn’t find the device the first time, if you go to the page again, then the connection is established. Although this is rather a problem of the quality of the mobile Internet.

I was also pleased with the time to enter the "working mode". For an already configured device, this is about 20 seconds:
As a result, the outlet "taken root" in the household and now regulates the operation of the compressor in the home aquarium, according to the schedule.
A small addition to the behavior of the device in "emergency" situations:
1) Power failure - everything works correctly. 2) Disabling Wi-Fi followed by restoration- everything works correctly. 3)Power outage/Wi-Fi and then recovery WITHOUT INTERNET CONNECTION - all timers/schedules are reset, scheduled tasks will not work. Only when the Internet connection is restored, all old tasks will appear and the device will work in normal mode.
The reason for this behavior in the third scenario, as far as I understand, is the lack of an internal battery to maintain the device's timer, i.e. after a power outage, the device time is reset to January 1, 1970. And only when WiFi connection With access to the Internet, the time is synchronized. The same thing happens after a Wi-Fi break and reconnect- if there is no access to the Internet at the time of connection, then the internal timer resets to January 1, 1970. At the same time, only the time zone can be specified through the application, there is no possibility to manually set the date / time.
So it's worth taking this into account in your work, without an active Internet connection, "smart" capabilities are significantly reduced. So to speak, the reverse side of modern technology.
Conclusion.
It's time to sum up. For me personally, this was the first experience of communicating with such devices. Therefore, the first time was just played with a remote on-off switch. Flashing a lamp from the other side of the city is an exciting experience...
But seriously, the thing is very useful and will be useful to many in the household. Anything can happen, sometimes the connected equipment can be in hard-to-reach places, but you need to turn it off / turn it on remotely. In this case, the thing is irreplaceable. The main thing is that Wi-Fi / Internet are available. Well, remember about the binding to mobile application- all management is only through it, there are no web interfaces here.
So whoever really needs it will buy it. Yes, now the prices for such solutions are not so low. Still, a novelty for the Russian market. Yes, and the course of the "wooden" is not happy. But, we can hope that with the advent of broad competition in this market, the price of such solutions will inevitably fall.
Advantages and disadvantages:
+ assembly, design, operation + ease of setup
Lack of Russification in the Kasa application - there is no built-in non-volatile timer (setting the device time only via the Internet).
May not suit:
- price
Thank you for your attention and happy shopping!
I express my gratitude to the DNS company and TP-LINK for the opportunity to test this device.
TP-Link recently introduced new devices. Smart sockets TP-Link HS110 and HS100. I will discuss these sockets in more detail in a separate article, and today we will install and configure them. If you have already become the proud owner of HS100 or HS110 sockets, then this manual may come in handy. Or maybe you'll just be interested to see what kind of devices they are, how they are configured and work. The devices are new and unusual. I have been testing these sockets for several days now, and I have something to tell and show you.
Models TP-Link HS100 and TP-Link HS110 are almost the same. Only the older model (HS110) can monitor power consumption. Electricity consumption statistics for all time and in real time.
The devices themselves are designed for remote control electrical appliances. We turn on the smart socket in a regular socket :), and we already connect some electrical appliance to it: a heater, a lamp, a fan, whatever. And through the Kasa app from your phone, you can remotely control this electrical appliance (enable and disable it). Also in the program, you can set the on / off timer, and view statistics on electricity consumption (if you have HS110 model).
Another important point: you can control a smart socket not only when you are at home. The outlet is connected to your router. And you can access the outlet from anywhere on your phone. The main thing is that the phone has Internet.
Connecting and configuring TP-Link HS110 and TP-Link HS100
As for the setup, as it turned out, everything is simple there. I have never set up smart sockets, therefore, I did not immediately understand what was happening. I will make it in the form step by step instructions. This will make it easier and more understandable.
1 First of all, you need to install the Kasa application on your smartphone or tablet. It is available for iOS and Android in the App Store and Google Play. Just type "tp-link kasa" in the popup and install the app. Through this application you can control smart sockets, and other devices from TP-Link.After launching the Kasa app for the first time, it will prompt you to log into your TP-Link account, or register a new one. You can skip this step by clicking on "Skip". But in this case, you will only be able to control devices when connected to your home Wi-Fi network. (to which the socket is connected). Therefore, I advise you to click on the "Create Account" button, and register in cloud service to manage devices from anywhere.
You just need to enter your e-mail and password. And then confirm the registration in the letter that will be sent to the specified mail. You will immediately be authorized in the application.
2 Next, turn on the smart socket in a regular socket. Press and hold the button with the gear icon for 5 seconds. The indicator will start flashing orange.


Give your outlet a name. We select an icon. You can even take a photo, or choose from an album. Next, you need to choose your wifi network, and specify a password from it so that the socket can connect to your Wi-Fi network.

We wait a bit, and everything is ready. You will see your socket in the device list.

If you have several outlets, then add them in turn, in the same way. After the setup is completed, the smart plug will stop broadcasting the Wi-Fi network.
TP-Link Smart Plug Control
Controlled entirely through the Kasa app. Immediately on the screen with the added sockets, you can control them, turn them on and off.
To discover more detailed information on the socket, just press it. There you can already set up a schedule, set a timer, watch electricity consumption (if you have TP-Link HS110) etc.

Going into the settings, you can remove the outlet, change its icon, name, time zone, see the MAC address, model, and firmware version.

I don't see the point in writing every item in the Kasa app. Everything is very clear there, despite the fact that the application is in English. I hope TP-Link will release an application in Russian in the near future.
Main functions:
- Turning on and off the smart socket by pressing a button in the application itself.
- Setting a timer that will turn off the device after a specified time.
- Set up a schedule for turning on and off the device connected to the outlet.
- Creating a device operation schedule from a TP-Link smart socket.
- View electricity consumption statistics (only for HS110 model).
I think that everyone can figure out the settings. Everything is step by step and understandable. If anything, leave questions in the comments, we will figure it out together.