Do you want to boot your computer from a flash drive or disk? To do this, it is not necessary to go into the BIOS settings. Especially if you don’t understand much about it. After all, there is an easier way. In this case, just enter the Boot Menu and change the device boot priority. This is done in about 10 seconds. And most importantly, there is no shamanism in the BIOS.
Boot Menu - what is it?
What do users usually do to reinstall Windows? As a rule, they record a licensed digital copy on, and then execute.
Boot Menu (or boot menu) is an extremely useful BIOS option. With its help, you can quickly set the boot priority of devices. Simply put, launching the Boot Menu opens a small window in which you can immediately put the flash drive (or DVD) in first place, and hard drive- on the second. In this case, you do not need to enter the BIOS.
In addition, changing settings in the Boot Menu does not affect the BIOS settings. That is, this option works once - for one activation. And when you restart your PC, Windows will boot from hard drive(as usual). If you need to run again Windows installation from a flash drive - call the Boot Menu again.
If you remember, when changing the settings in the BIOS, you had to go into it again and change the device boot priority back (i.e. put the hard drive in first place). But in the case of the Booth Menu, you don’t need to do this.
How to call Boot Menu
It's very simple - click one key when Windows boots. Which one exactly? It depends on:
- BIOS version;
- motherboard;
- laptop models.

That is, the situation is exactly the same as with the BIOS. For example, in order to, you need to press the Del or F2 button, and to open the Boot Menu you need to click another one.
Most often this is Esc or F12. Although, as mentioned above, the call button may differ on different PCs.
Therefore, below we will look at how to launch the Boot Menu on popular brands of laptops and personal computers.
How to enable Boot Menu on Lenovo laptops
Owners of Lenovo laptops should not have any difficulties. After all, the Boot Menu on Lenovo is launched very simply - by pressing the F12 key when loading Windows.

Plus, on the body of many models there is a special button with a curved arrow. You can press it if you want to select additional. download options.

Launch Boot Menu on PC with mat. Asus board couldn't be easier
You need to press the F8 key when it boots (at the same time that you would normally enter the BIOS).
And there is a little confusion with Asus laptops. It seems that the manufacturer is the same, but there are several buttons to launch the Boot Menu. After all, the Boot Menu on Asus laptops is launched using one of two keys:
Most often this is the Esc button, although it can also be F8. However, there are only 2 keys.
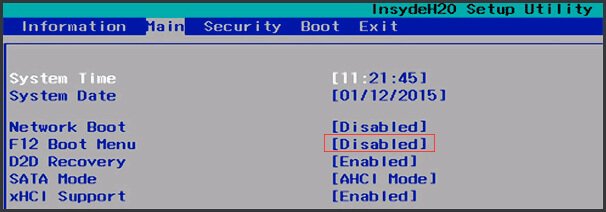
The boot menu on Acer opens by pressing the F12 button
But there is one small nuance here. The fact is that usually starting the Boot Menu on Acer laptops disabled. And when you press F12, nothing will happen. To make it work, you need to do the following:
- Go to the BIOS (when booting the laptop, press the F2 button).
- Go to the “Main” tab.
- Look for the line “F12 Boot Menu” and change the value “Disabled” to “Enabled”.
- Save the changed settings and exit the BIOS.

The system will reboot and you can enter the boot menu on your Acer laptop using F12.
How to enable Boot Menu on Samsung laptops
On Samsung you need to press the Esc key. But owners of Samsung laptops need to know one feature. The fact is that to call the Boot Menu you need to click the Esc button once! If you click twice, the window will simply close.
Therefore, you will have to get used to it in order to know exactly when to press the Esc key. Although there is nothing complicated here - just a couple of attempts.
HP also has its own specifics
Launching the Boot Menu on HP also has its own specifics. After all, opening the Boot Menu is done a little differently.
- At turning on Windows Immediately press the Esc key.
- The launch menu will be displayed - press the F9 button.
- Ready.
After this, the boot menu of the HP laptop will open, and you can set the priority for turning on devices (using the arrows).
Boot menu on Windows 10 or 8
If Windows 8 or Windows 10 is installed on your PC or laptop, then you most likely will not be able to enable the Boot Menu.
The fact is that these OSs have a small peculiarity - by default they have “Quick Start” enabled, so they are not completely turned off. This is called hibernation (something like sleep mode). Therefore, when you boot your PC or laptop, you will not be able to open this menu on Windows 10.
There are three ways to fix this:
- Hold Shift when turning off your laptop or PC. After this, it will turn off normally (in the usual sense of the word). And then you can launch it on Windows 10 by pressing the desired key.
- Instead of turning off your PC, you can restart it. And at the moment of turning on, just press a specific key corresponding to your laptop brand or motherboard.
- Disable the Quick Start feature. To do this:

 That’s it – now you can easily access the Boot Menu on Windows 10 or Windows 8.
For your convenience, below is a screenshot showing the keys to launch the Boot Menu for popular laptops and PCs
For example, for computers running on a mat. MSI board is the F11 button. And the Boot Menu on Sony VAIO laptops is launched using F12. In general, you can figure it out for yourself - the table is simple and understandable.

Also, for convenience, buttons for entering the BIOS are written. If for some reason you are unable to open the Boot Menu, you can always change the device boot priority in a standard way- via BIOS.
What is Boot Menu, why is it needed and how does it replace BIOS. In fact, when selecting devices, the boot menu is best to use. More details below.
Everyone more or less experienced users computer, it is known that when installing an OS, or using a tool from a disk drive or flash drive, it is necessary to prioritize these devices in the BIOS, in simple words - what will load first when the PC starts. You can use it for this.
Boot Menu(boot menu) – a boot menu designed to simplify the selection of devices from which it is possible to boot. You turn on the computer, go to the boot menu using special keys, and then use the arrows to select a boot device, for example, a flash drive or floppy drive. This makes it easier for inexperienced users to perform many actions.
Now we will learn how to enter the Boot Menu using regular keyboard shortcuts. And also how to do it on laptops.
How to enter the Boot Menu - BIOS boot menu
When we enter the BIOS, we press a certain combination on the keyboard. The same is true for the Boot Menu. In many cases, the following methods are relevant for laptops and motherboards: Esc, F11, F12, although there are other options for entering the boot menu.
It makes sense to use this feature if you do not need to change any parameters in the BIOS, except for setting the boot order.
So, if you have a laptop with Windows 8, and now with Windows 10, the above keys are not guaranteed to work. In some models, when you turn off the laptop, the device can be considered to go into hibernation mode and not turn off as usual, so an attempt to enter the boot menu is unsuccessful.
To get rid of this problem you can use the following methods:

How to enter the Boot Menu from an Asus laptop
Most possible options The input keys for Asus are the following keys:
- ESC - for many brands;
- F8 – for devices where names can begin with the letters X and K, if it doesn’t work, then use Esc.
Entering the boot menu from a Lenovo laptop
In these models it is even simpler, you press the F12 key and get to the boot menu. Also, many laptops of this brand have a special arrow button that allows you to select the boot type, for example, BIOS, Boot Menu, or recovery mode.
and translate the option there F12 Boot Menu to the on position – Enabled. Then we save the applied actions, reboot and try to log in again using the F12 key.
Entering the Boot Menu of an HP laptop
I have a laptop of this brand, so I know a lot about it. You can enter the boot menu from this device like this:
- Esc is a fairly common option;
- F9 – when you press the Esc key.
Logging into the Boot Menu on other motherboard models
The options I described below are practically the same as described above, that is, the same keys:
- Dell laptops - F12 key.
- Toshiba - F12 key.
- Samsung - Esc key.
- Motherboards from Intel, FoxConn, Phoenix-Award – Esc key.
- Motherboards from Gigabyte - F12 key.
- Board from Asus, AMI - F8 or F11 key, as on laptops.
- MSI, ECS, AsRock, Sony – F11 key.
- BioStar - F9 key.
- Asus AMI – ESC key.
- Fujitsu - F12.
Here, I described most of the models. If you are unhappy that your laptop or motherboard model is not listed, please leave a comment and I will try to help you. You can always find more details in the instructions for your computer or laptop motherboard. If you don’t have a paper version, look for an electronic one on the Internet.
Why does the Boot Menu not work on a laptop?
If your boot menu refuses to work, that is, it does not start or does not see connected devices, then there are a number of explanations for this.
It turned out that on some laptops this mode does not function for the simple reason that UEFI mode is enabled, and not BIOS Legacy Mode. In this case, you can try to enable either Legacy BIOS or UEFI and check the operation of the boot menu.
The second reason is a rare failure. In this case, it is impossible to enter both the boot menu and the BIOS. Treatment is usually simple - turning off and turning on the computer again. The second method is by removing the CMOS battery.
It is possible that the boot menu on your device is disabled, but on some laptop models you can enable it. Go to the BIOS and find the F12 Boot Menu item there, which should be set to Enabled.
The BIOS is configured so that it knows that it must boot from a floppy disk or disk. This is done mainly to install Windows or another boot program. Read about how to make it in this section.
BIOS setup
At this stage, it is necessary to configure the BIOS so that the computer boots from the system (boot) floppy disk or disk. By default BIOS tries to load the operating system by searching for its bootloader program first on drive A: (in most computers this is a three-inch drive), and then on the first hard drive of the computer.
However, if someone has already changed the BIOS settings, as is almost always the case on previously working computers, the boot order may be completely different. Just in case, we'll go through all the BIOS settings for loading the operating system from disk together - it doesn't matter whether your computer is already configured the way we need it or not. In any case, the environment will not be affected by the fact that you learn how to handle BIOS settings.

To enter the BIOS settings mode, in most replaced motherboards you must immediately press the Delete key immediately after turning on the computer, and when you enter the BIOS you will see an image on the monitor similar to that shown in the picture.

You need to use the arrow keys to go to the Boot menu, as shown in the picture.

If the BIOS is configured so that Hard Drive is selected as the first boot device, you need to change this parameter to Removable Devices.
Select an item Removable Devices and press the "+" key. Remember to save changes in the BIOS: in the Exit menu, press the Enter key and in the Exit Saving Changes item. In the next menu dialog, you need to confirm the need to save the changes made by pressing the Enter key in the Yes position.
After rebooting, the computer will boot from the installation floppy disk or dvd disc, which must be inserted into the drive. After this happens, you can move on to the next stage of work - preparing the hard drive.
P.S. In the BIOS settings, you can not only change the boot sequence modes, but also set such primitive parameters as date and time. All other switches must be performed only after reading other instructions for setting up the BIOS, otherwise you may disrupt the operation of the computer.
The Boot Menu can be called up when you turn on your computer or laptop by pressing the corresponding key. Key for call Boot Menu (also known as the boot menu) depends on the manufacturer of the laptop or the motherboard of your PC. If you have already entered BOIS, then the boot menu is called up in much the same way. Moreover, this menu applies to BIOS system(UEFI). This one is just a function.
In fact, this is a very useful thing. The boot menu is a window where you can select a device to boot your computer. For example, select a CD/DVD drive from the menu and boot the computer from boot disk. Or boot from a flash drive. You probably know what to install, or Windows recovery, checking your computer for viruses from a Live CD, or to run other programs, you need to boot your computer or laptop from a boot disk or flash drive.
Since the key depends on the manufacturer of the motherboard or laptop, below I will consider different options for entering the boot menu for individual manufacturers of these same laptops and motherboards. But first, let's look at some of the nuances in Windows 10 and Windows 8.
Boot Menu in Windows 10, Windows 8 and 8.1. A few nuances
If you have Windows 7 installed, then everything should work out right away. But to enter the Boot Menu on a computer with installed Windows 10, or Windows 8 (8.1), you will most likely need to perform a few additional steps.
The whole point is that turning off the computer or laptop on these operating systems, it doesn't completely turn off. This is made for fast loading when turned on again. Therefore, the boot menu may not open.
If the Boot Menu does not open for you, try the following:
- Restart your computer and press the required key. Do a reboot, not a power cycle.
- In Windows 8, try holding down the Shift key and turn off the computer while holding this key. Then turn on the computer and press the key to enter the Boot Menu.
If this does not help, then you need to disable quick start. We do this (at Windows example 10):

I hope everything worked out.
Boot Menu on ASUS laptops
On my not very new ASUS laptop (model K56CM), you need to press the Esc key to enter the Boot Menu. If Esc doesn't work, try pressing F8 or F9.
The boot menu itself looks like this:
As you can see, I have three devices there. This means that I can upload my ASUS laptop from an SSD drive (by default), a flash drive (it is already connected to the laptop) and DVD drive. Just select the required option and the download will begin. If you select “Enter Setup”, the BIOS will open.
Boot menu on Acer laptops
If you have an Acer laptop, then immediately press the F12 key when turning it on.
But, Boot Menu on Acer may not work. It needs to be activated in BIOS settings, which can be accessed by pressing the F2 key. There you need to find the “F12 Boot Menu” item and turn it on (set Enabled). This setting is located on the “Main” tab.
After rebooting and pressing the F12 key, the boot menu we need should open.
How to enter the Boot Menu on a Lenovo laptop?
Use the F12 key when turning on the laptop. Almost all Lenovo laptops use this key.
This manufacturer has a little trick. I'll tell you now.
To enter the Boot Menu on an HP laptop you need to press the Esc key. But the menu will not open. You also need to press F9 in the start menu.
After this, a window should appear with different options for booting the laptop.
Keys for calling the Boot Menu on PCs (for motherboards) and other laptops
In the last section of this article I want to collect information that will be useful to you when calling boot menu on desktop computers with different motherboards and laptops, which I did not write about above.
Motherboards:
- MSI - F11 key
- ASUS-F8
- Gigabyte-F12
- Intel - Esc
- AsRock - F11
Laptops:
- The Boot Menu on a DEL laptop is called by the key – F12
- Toshiba-F12
- Samsung - Esc
- Sony Vaio– F11
- Packard Bell-F12
I will be glad if this information was useful to you. Write reviews in the comments, ask questions!
The computer does not boot, what should I do? In the operation of the system, this is possible due to the action of various viruses, your errors in using Windows or using the wrong drivers. But don’t despair, I suggest you learn to get out of such situations with dignity.
You can always try to fix such sudden problems using the F8 key and the additional options menu windows loading 7.
When starting the computer, after BIOS boot press F8 key, which will bring up a menu for managing additional boot options for Windows 7.
About boot modes: " Safe Mode", "Safe Mode with Networking" and "Safe Mode with Networking" command line"You can read the article
Let's consider the remaining parameters:
Load Logging- here Windows will log the loading of all drivers and services by writing it to the file ntbtlog.txt, which is located in the Windows folder. After a system startup fails, this mode will view the boot log from the system recovery console and find the driver or service that is responsible for the boot failure.
Enabling low resolution video mode (640x480). Boots the computer with a screen resolution of 640 x 480. This allows you to eliminate incorrect monitor and video adapter settings, for example, if your monitor cannot support the set setting.
Last Known Good Configuration (optional)- when loading in this mode, the saved computer state data is used after the last successful boot of the system, which cancels changes made in the settings after this save. This allows you to uninstall the installation of a driver or change the settings of services or the operation of installed equipment. Use this mode to uninstall installed drivers or unsuccessfully change settings in services.
Directory Services Restore Mode- This option works on server systems and restores the directory service on the domain controller.
Debug mode used by professional programmers to debug the system. When using this mode, debugging information is sent to another computer via a serial port.
Disable automatic reboot on system failure- In the default settings, if there is a critical error during the boot process, the system automatically reboots. When you select this item, the mode automatic reboot will be turned off, which will help you examine the error message in detail.
Disabling mandatory driver signature verification- this option allows you to disable scanning at system boot digital signatures at the drivers. Sometimes this check can be the source of a download problem. This option will also allow you to install an unsigned driver. However, to use such drivers, you will need to constantly select this option when loading Windows.


